
Security Awareness Training
Admin guides

What is Cyber Security?
Cyber security involves using various methods and tools to protect your computer systems, networks, and devices from cyber threats like hacking, malware, and phishing. Its goal is to prevent unauthorised access, theft, alteration, or destruction of sensitive data. In today’s digital world, safeguarding everyday devices against cyber-attacks is essential to keeping your business safe.
When you log in you will be presented with the home page similar to below:
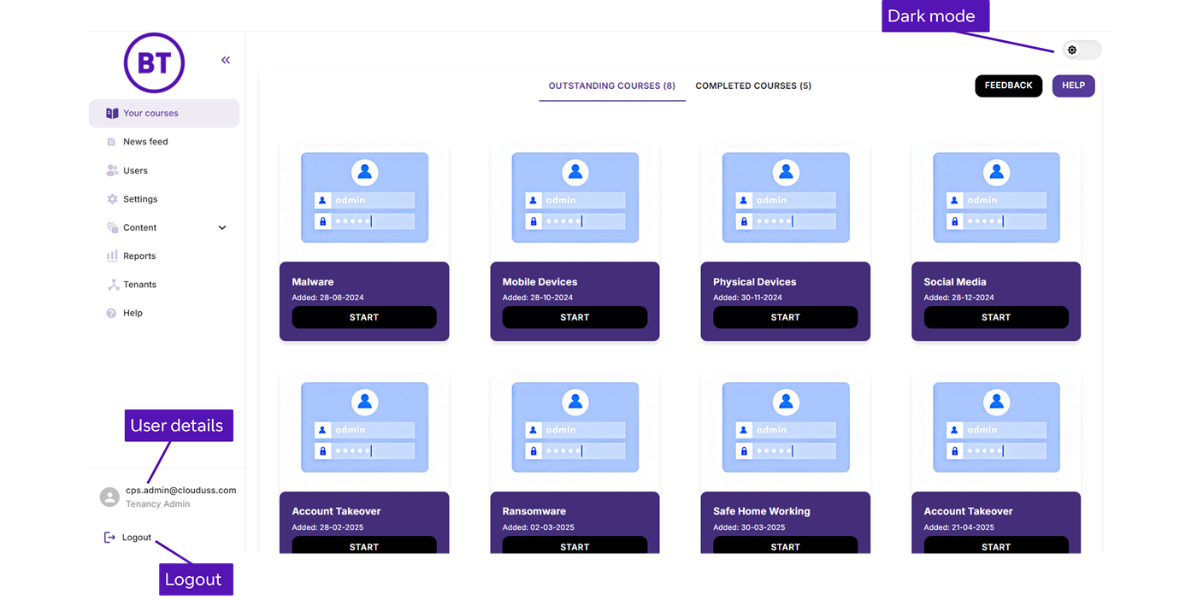
Use the navigation tab on the left side of the screen. Key tabs include:
| Your Courses | View and manage your outstanding and completed courses, these are shown on the homepage, and as a tab at the top to toggle between both |
| News feed | This page shows the latest news related to IT security from various trusted partners. |
| Users | This page provides all user management functionality including user permissions, manual user addition and deletion, automated user synchronisation and user auditing, this section has four areas of: : ‘User management’, ‘User sync’, ‘Additional data’ and ‘Logs’. |
| Settings | Configure and manage your account. |
| Accessibility | In the top right corner on the webpage is the option to switch the UI from light to dark mode. |
| Journey Builder | Create, view, and edit learning journeys |
| On Demand | Allows courses and simulations to be sent out to users immediately or scheduled alongside the planned learning journey |
| Content Packs | Allows the creation of content packs (a set of courses) which can be sent out to users. |
| Reports | Access dashboard and reports on user engagement |
| Feedback | Send suggestions to improve the platform |
| Help | You’ll be able to raise an incident with our service desk and navigate to BT Business Apps |
| Device Accessibility | If you’re working on a small screen, the left-hand menu will be collapsed by default. To expand or collapse the menu, click on the chevrons next to the logo in the top left corner. |
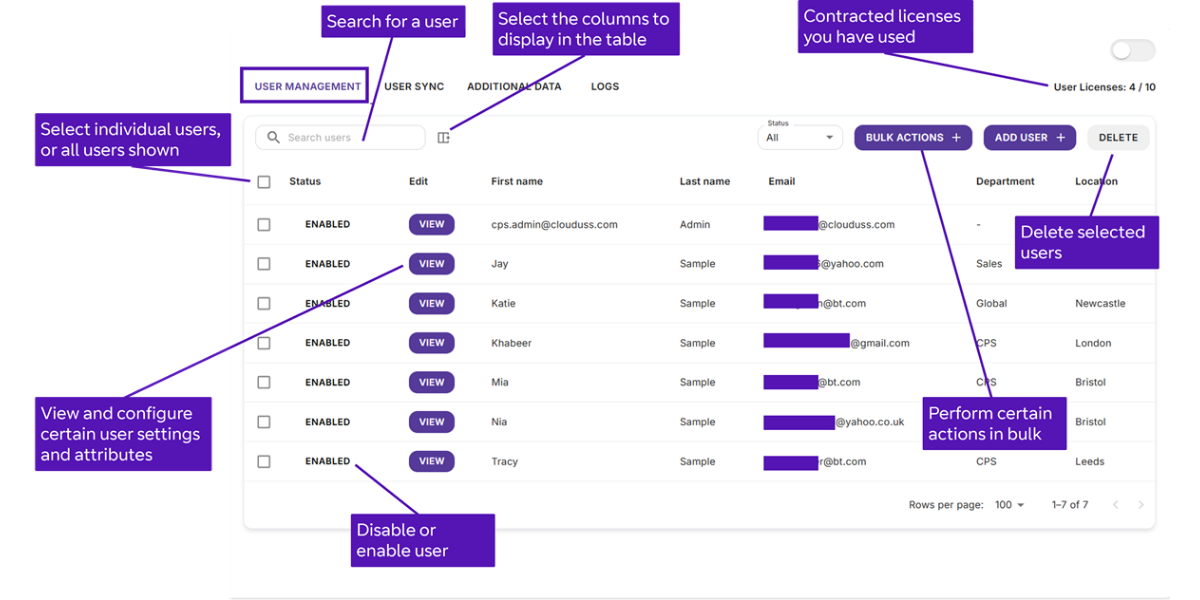
On your navigation menu on the 3rd tab it displays ‘users’
- Access the ‘Users’ tab to:
- Manage user accounts and permissions.
- Synchronise user data with Microsoft or Google.
- Manage additional user information.
- View user activity logs.
Admins can enable/disable accounts and delete users directly from the user table for efficient management.
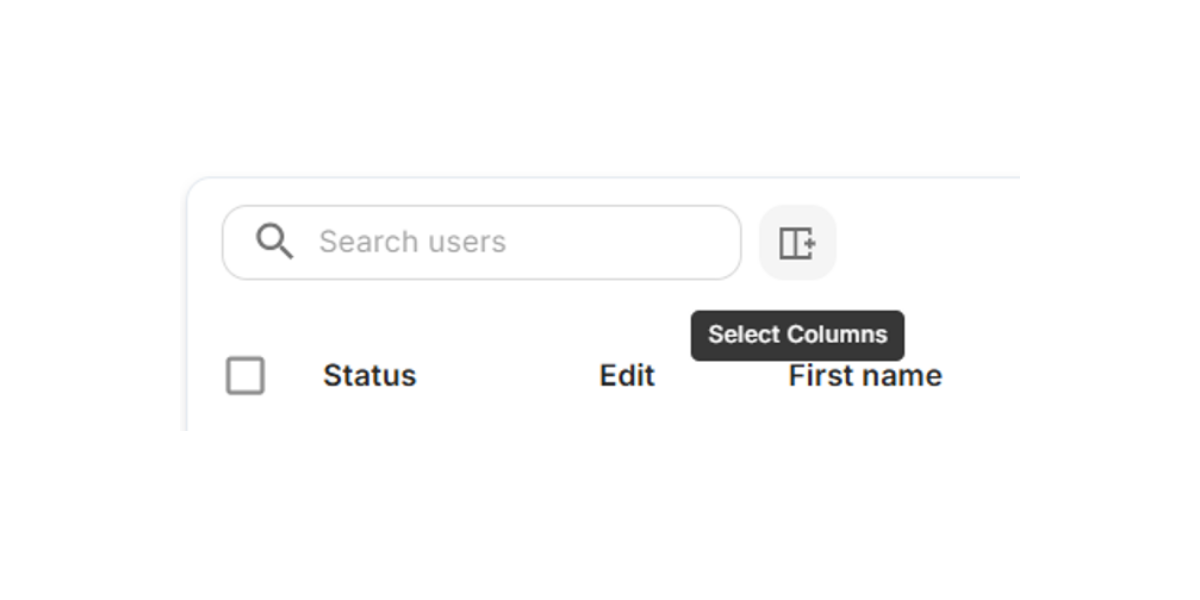
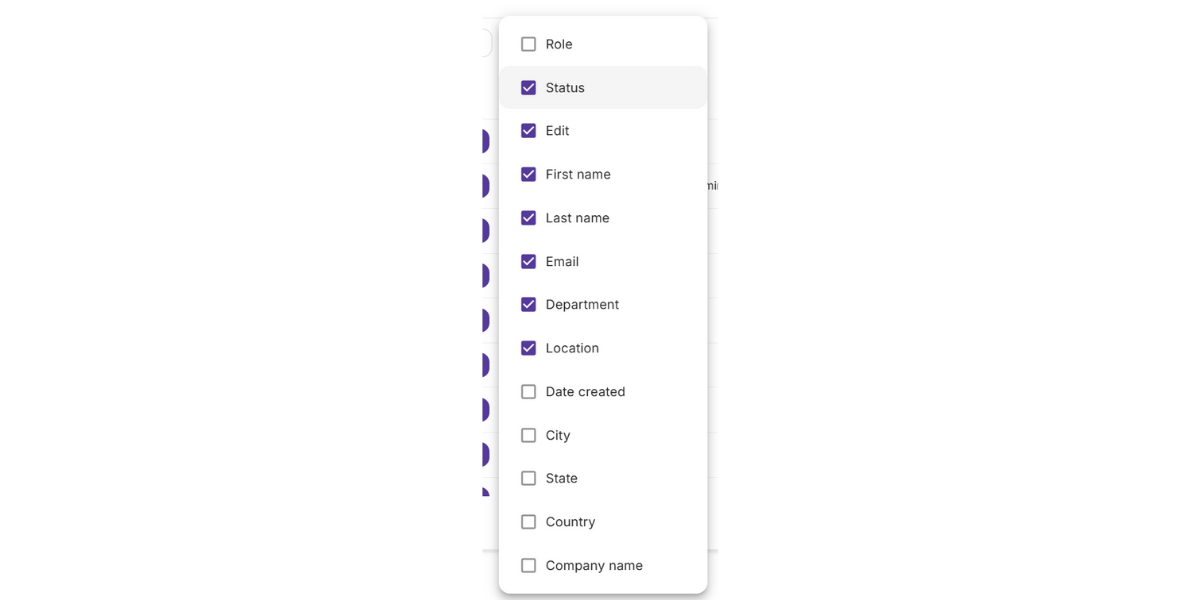
To update the attributes displayed for users:
- Click the ‘Select Columns’ Icon: This will open a list of available attributes.
- Show or Hide Attributes: Choose which attributes to display or hide in the user table.
Additionally, you can filter users based on specific attributes:
- Apply Filters: Use the filtering options to narrow down the user list based on criteria such as user group, department, or other attributes.
- Refine Results: Adjust filters to view only the users that meet your selected criteria.
Admins can perform several actions directly within the user table without opening each user's details:
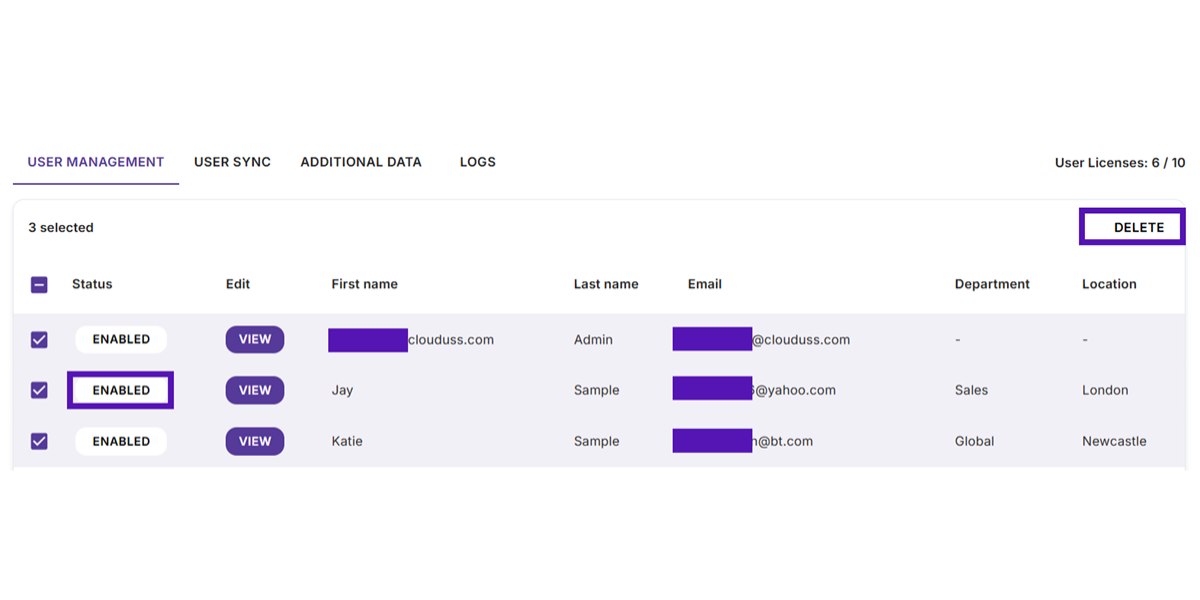
Enable/Disable User Accounts:
- Click the ‘Enabled’ or ‘Disabled’ icon next to the user to toggle their account status.
Delete Users:
- Select one or more users and click the ‘Delete’ button to remove them.
These options streamline user management, making it quick and efficient.
User Sync
Once connected and operating normally, the ‘User Sync’ tab will display a screen similar to the one shown below. Here, the admin can:
- View Sync Configuration: See details of how the sync is set up.
- Check Connected Groups: Identify which groups are connected.

Once connected to Google or Microsoft and operating normally, the User Sync tab will display a screen similar to the one shown below. Here, the admin can:
- View Sync Configuration: See details of how the sync is set up.
- Check Connected Groups: Identify which groups are connected.
To access Simulations and courses, as an administrator you select the ‘On Demand’ option in the left-hand below.
/sh_slide18_screenshot1.png)
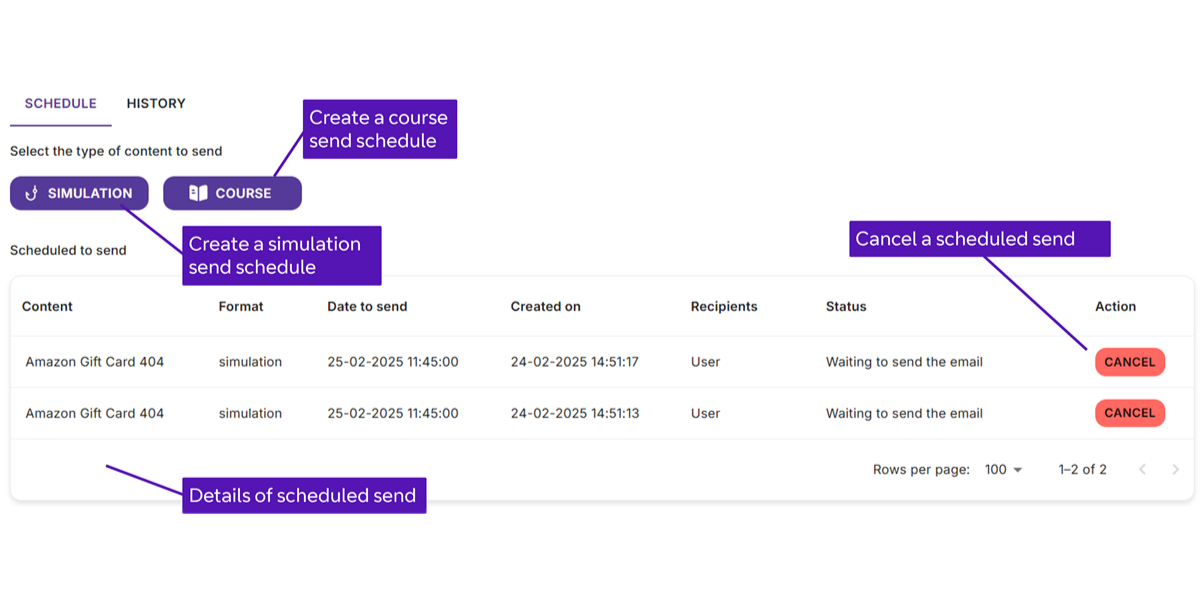
The Schedule tab allows you to create simulation sends by clicking the Simulation button, and course sends by clicking the Course button, using a simple step-by-step wizard described in the following sections.
It also displays upcoming sends in an easy-to-read table, with the option to cancel them if needed.
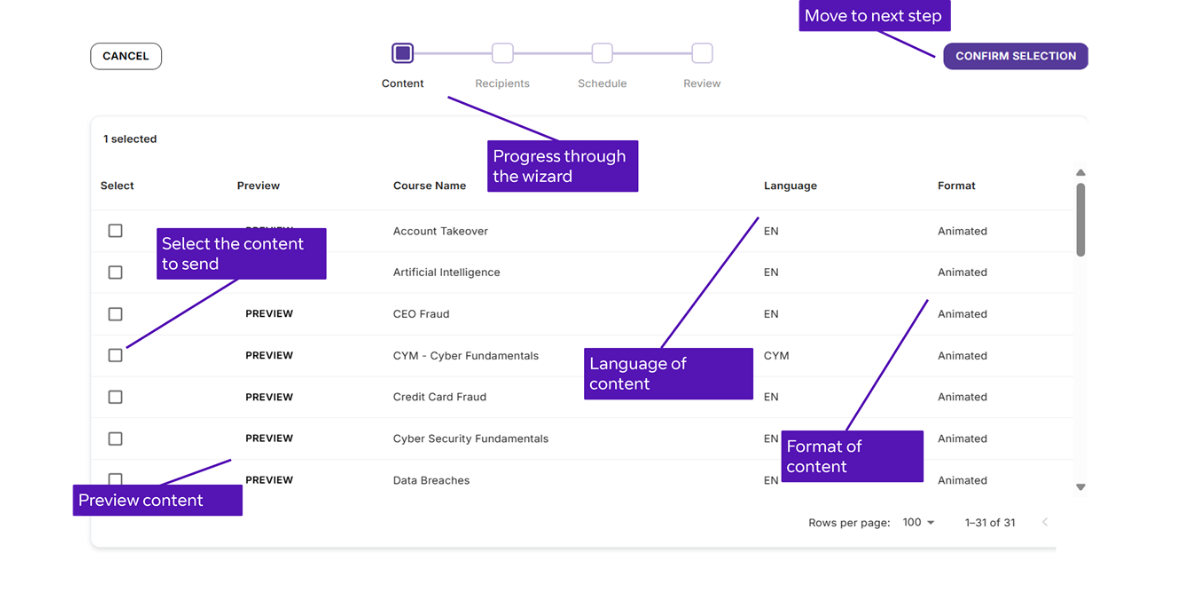
After clicking the ‘Simulation’ button, as an administrator you are taken to a simple four step wizard to create a scheduled send as shown below.
Simulations:
- Create scheduled sends using a simple four-step wizard.
- Choose from three types of phishing simulations:
Single Stage: The user clicks on a link and is redirected to a landing page, indicating that this was not a real phishing attack.
Two Stage: The user clicks on a link and is redirected to enter their details into a fake domain. After entering their details, they are taken to a landing page, indicating that this was not a real phishing attack.
404: Similar to the single stage simulation, but instead of a landing page, the user is taken to a blank page displaying "404 – Block Page." This is useful if you prefer not to reveal that these emails are simulations.
- Personalised or Bespoke learning journeys can create custom simulations.
Note: The availability of simulations in your library depends on the learning journey you choose.
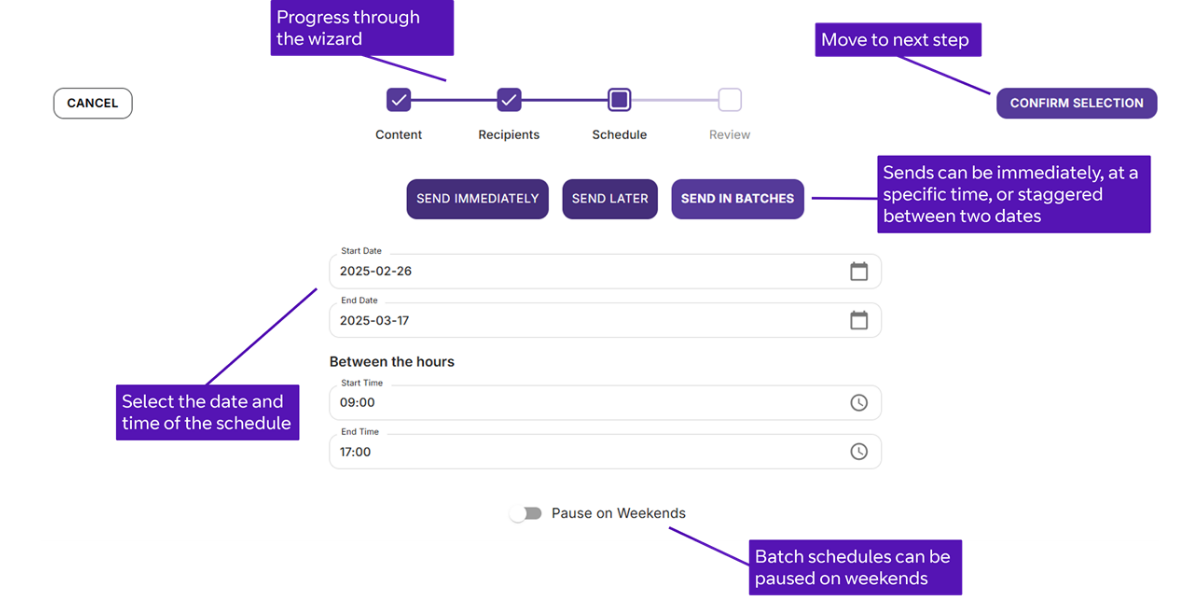
In this step, you can select when to send your simulations, with three flexible options available:
- Send Immediately: Dispatch the simulations right away.
- Schedule for a Future Date: Choose a specific date and time to send the simulations.
- Randomised Batches: Distribute the simulations randomly in batches within a defined date range. If the send period spans more than one week, you have the option to pause sends over weekends.
This flexibility enables you to tailor the timing to suit your organisation’s needs and maximise user engagement.
Note: Within the ‘Simulation’ tab, users on a Personalised or Bespoke learning journey have the option to create their own simulations.
Follow these steps to quickly set up and schedule a course send:
1. Click the ‘Course’ Button
This will launch a simple four-step journey builder designed to guide you through creating a scheduled course send, as shown in the image above. Follow the prompts on-screen, and refer to this guide for additional support if needed.
2. Select Courses
From the course library, choose one or more courses to include in your schedule. The available courses will depend on the learning journey assigned to your organisation.
3. Review Course Details
A table will display detailed information about each course, including an option to Preview the course content before making your selection.
4. Complete the Journey Builder
Continue through the remaining steps in the journey builder to finalise your course selection and schedule.
5. Confirm Course Selection
After choosing your courses, click the Confirm Selection button to proceed.
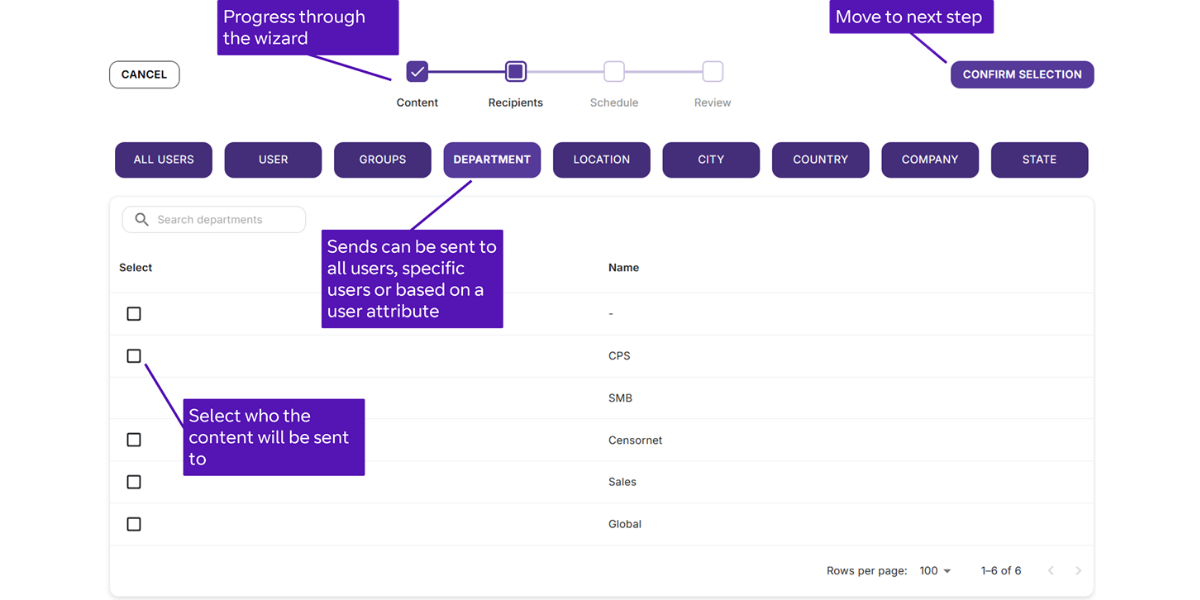
6. Choose Recipients
Select who will receive the courses:
All Users: Send to everyone in your organisation.
Specific Individuals: Select particular users.
User Attributes: Target recipients based on criteria such as department, role, or user group.
7. Select Timing Options
Choose when to send the courses:
Send Immediately: Dispatch the courses right away.
Schedule for a Future Date: Set a specific date and time for sending.
Spread in Batches: Distribute the sends over a range of dates. If the schedule spans more than one week, you can pause sends over weekends as needed.
These options provide flexibility to ensure your courses are delivered at the most convenient times for your organisation.
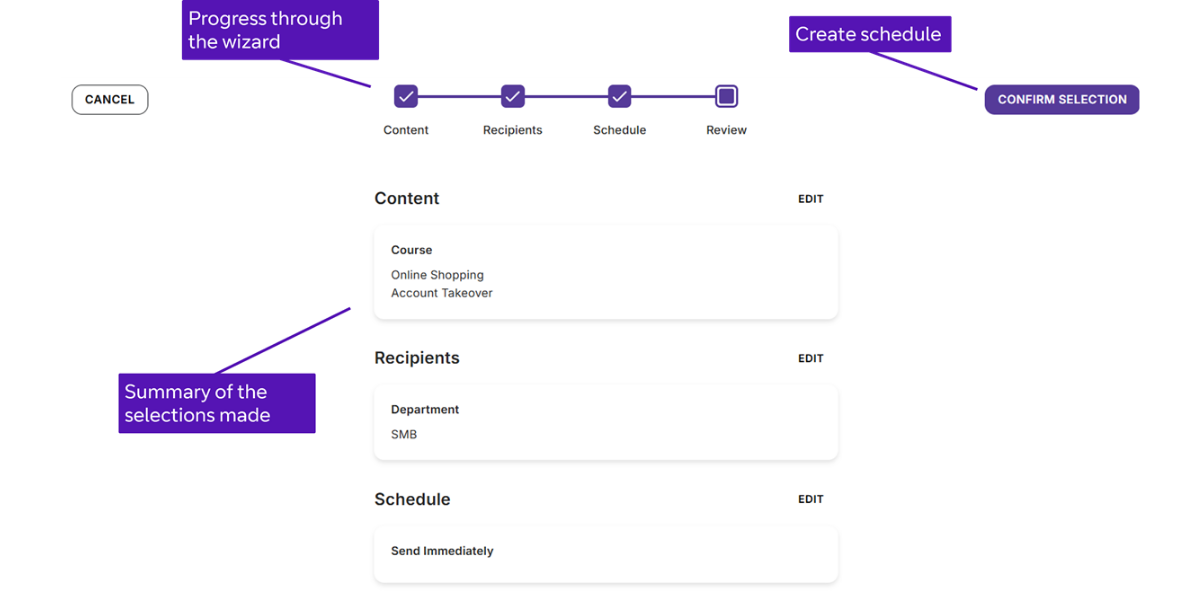
8. Course Schedule Completion
The final step presents a clear summary of all your selections and settings. Review this summary carefully to ensure everything is correct before finalizing the send.