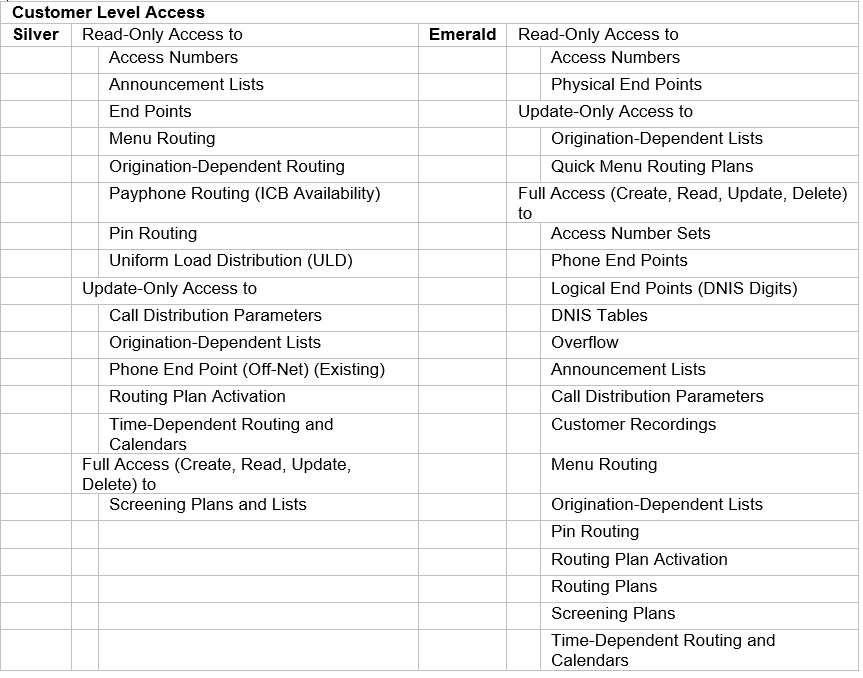
Access Levels
Call Traffic Controller is used by BT personnel to implement customer applications onto the intelligent network. Customer users of Call Traffic Controller see the same information that is used by BT personnel to implement and troubleshoot applications.
All customer applications are pre-built and tested before being handed over to the customer for service and Call Traffic Controller access. User permissions are controlled by system administrators and are compliant with BT Security processes and procedures.
Controller basics
Controller fundamentals
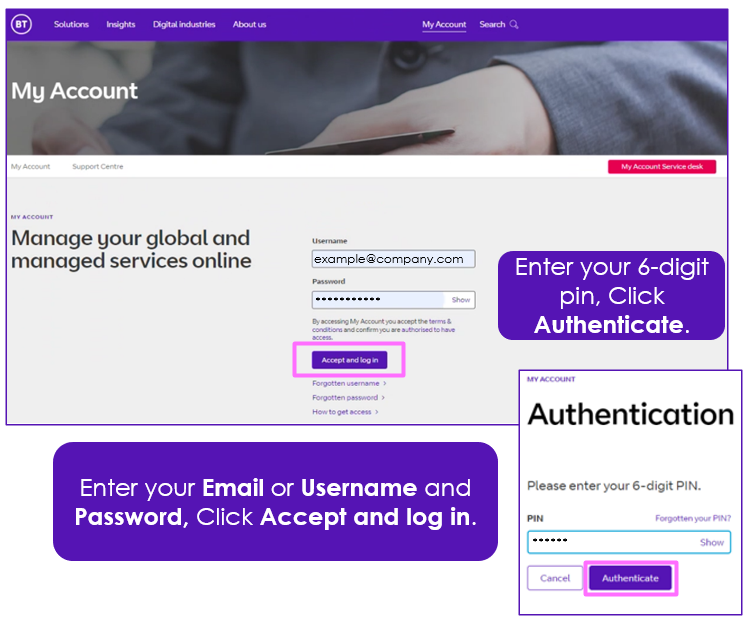
Logging on
Customer users log on via the Global Services Portal account: https://business.bt.com/
Call Traffic Controller is listed under applications. New users must be authorised and have a dedicated account created in Call Traffic Controller.
Some features remain restricted to BT personnel and must be requested via customer account team:
- Requesting new access numbers
- Dedicated terminations
- Initial complex routing plans
Users are assigned access by Inbound Contact Corporate Id, a user ID may have access to multiple corporate IDs if appropriate.
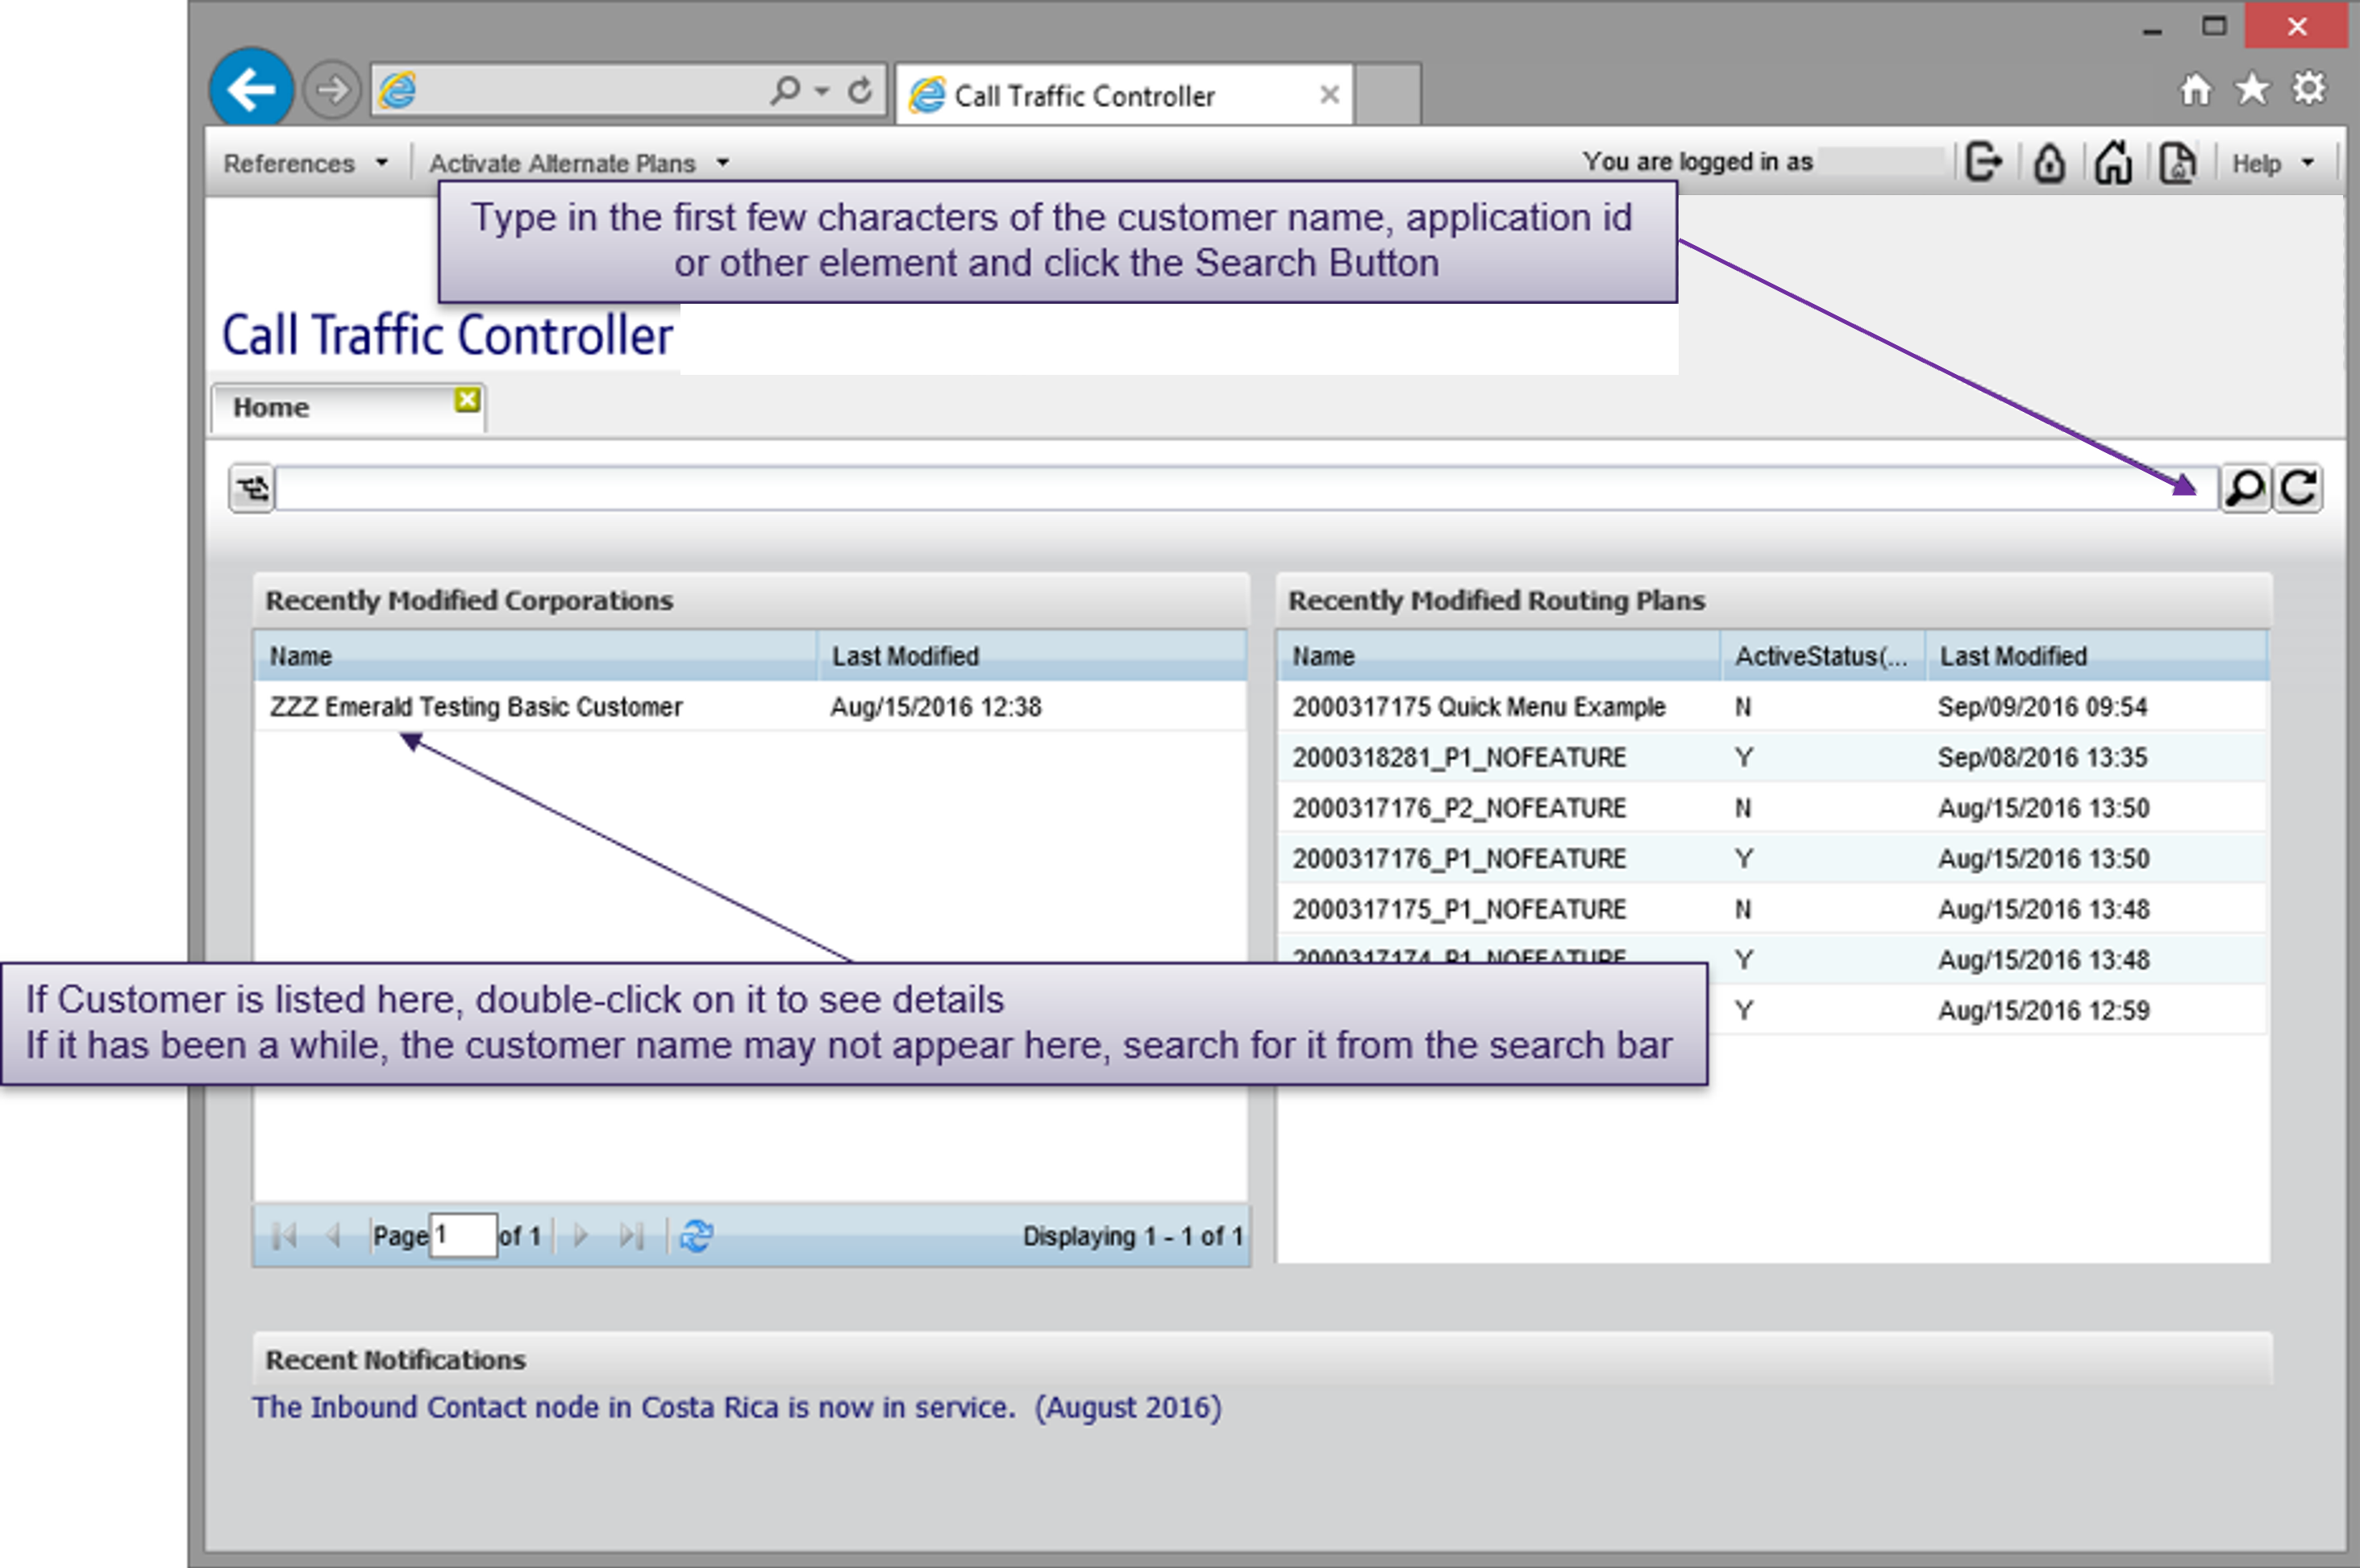
Controller home screen and navigation
The home page of controller displays the corp ID(s) the user has access to and the list of routing plans that have been modified in chronological order.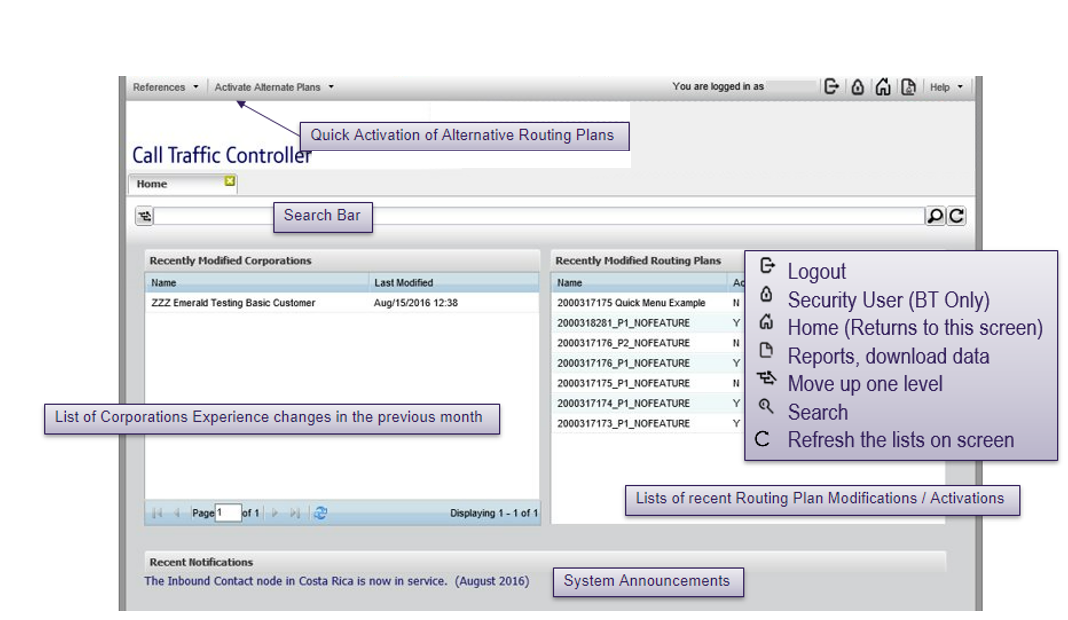
Getting started
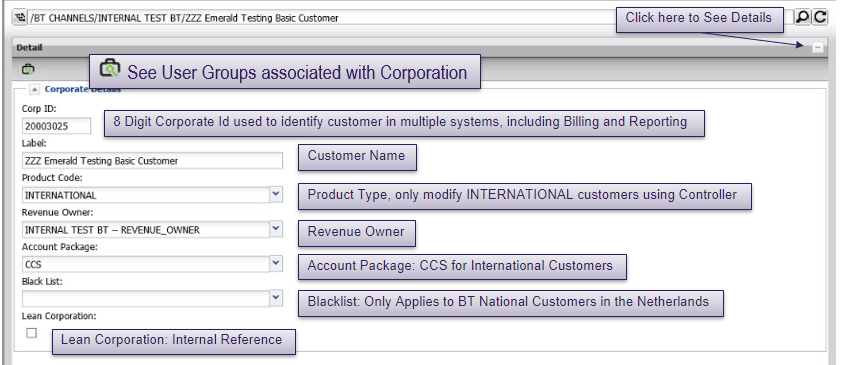
Corporate details
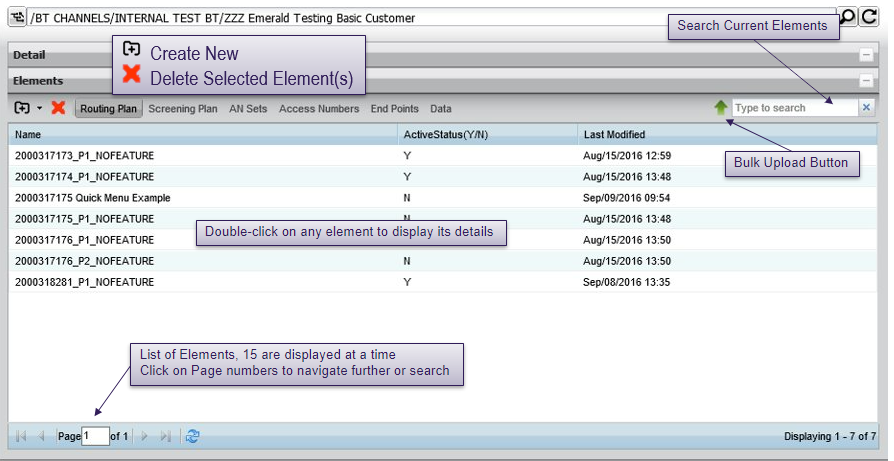
Elements page
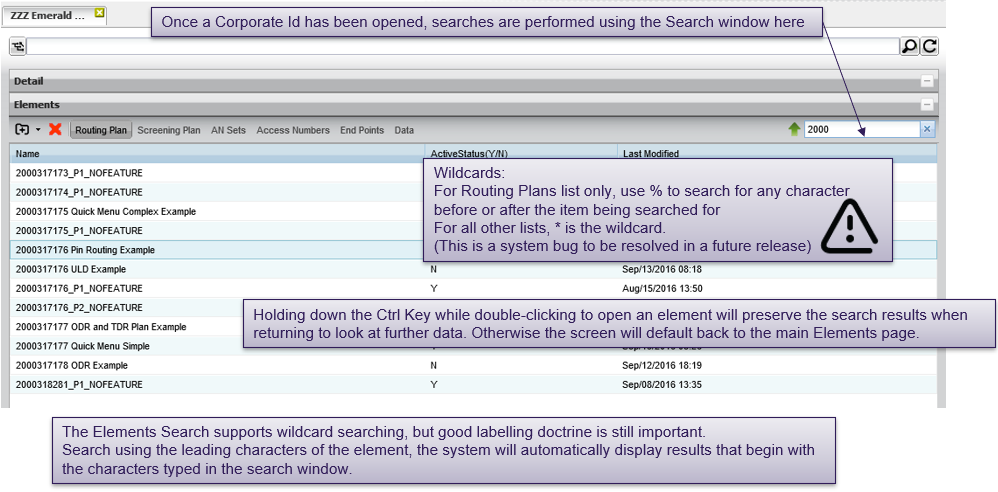
Searching data
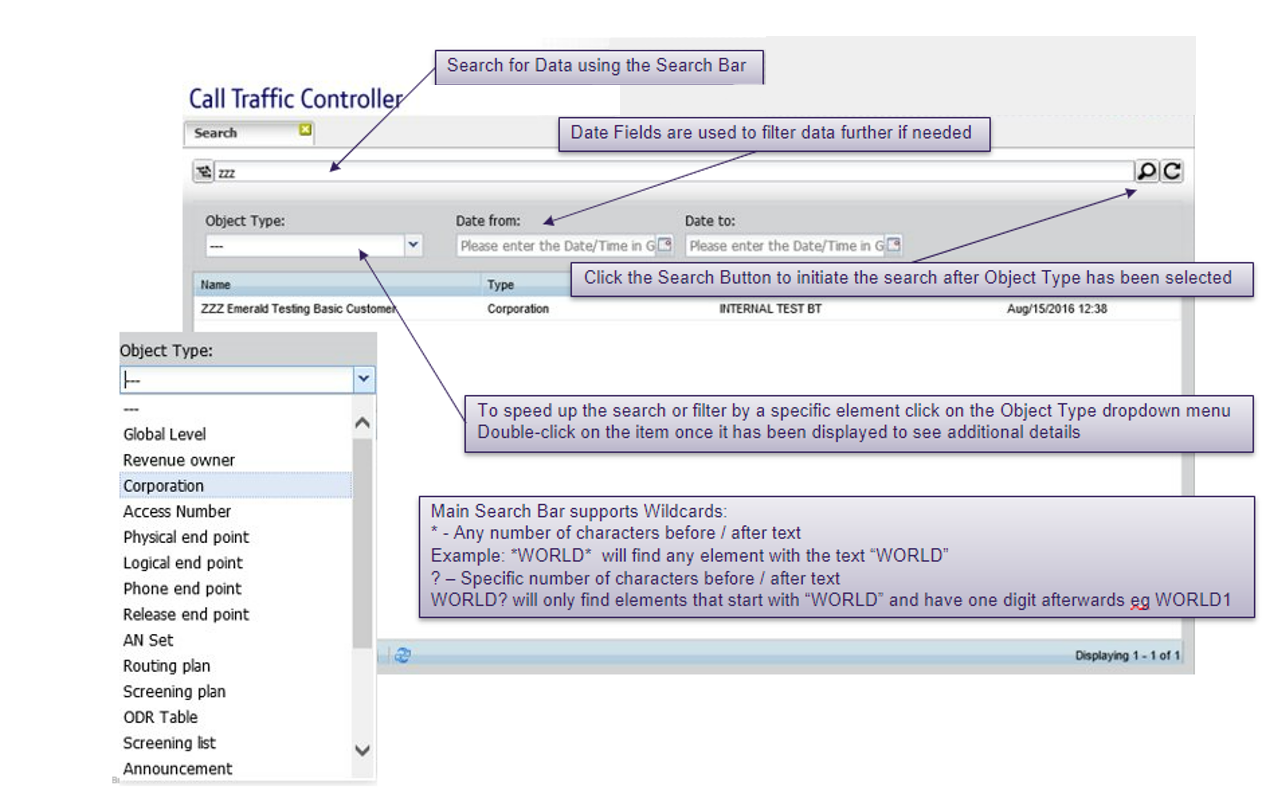
Searching tips
To perform a general search on service (e.g. to search for a routing plan), type the complete name or only a few letters with wildcard character * then click on the search icon. The list of all names matching the search criteria are listed, together with their type.
Bulk uploading data to Call Traffic Controller
Call Traffic Controller supports importing lists of data
- Files must be comma-delimited (CSV)
- Files must be in the format specific to the feature
- Data Limited to 1000 lines per file to be uploaded
Features that support bulk upload
- Screening lists
Format: CLI, start date/time (optional), end date/time (optional)
- CLI: international format, include country code
prefixes can be used, for example to block calls from France, specify 33 - Example (with start / end dates): 33123456789,2016-08-01 00:00:00,2017-08-01 00:00:00
- Example (no dates): 33123456789. 33123 (all calls where CLI begins with 33123)
Authorisation code lists
- Format: authorisation code, start date/time (optional), end date/time (optional)
- Example (with start / end dates) all times must be GMT :
1234,2016-08-01 00:00:00,2017-08-01 00:00:00 - Example (no dates): 1234
PIN code lists
- Format: PIN code, start date/time (optional), end date/time (optional)
- Example (with start / end dates) all times must be GMT:
1234,2016-08-01 00:00:00,2017-08-01 00:00:00 - Example (no dates): 1234
Phone end points
- Format: phone end point (in international format), originating country code
- Example:
918001234567,9
44207222333444,44
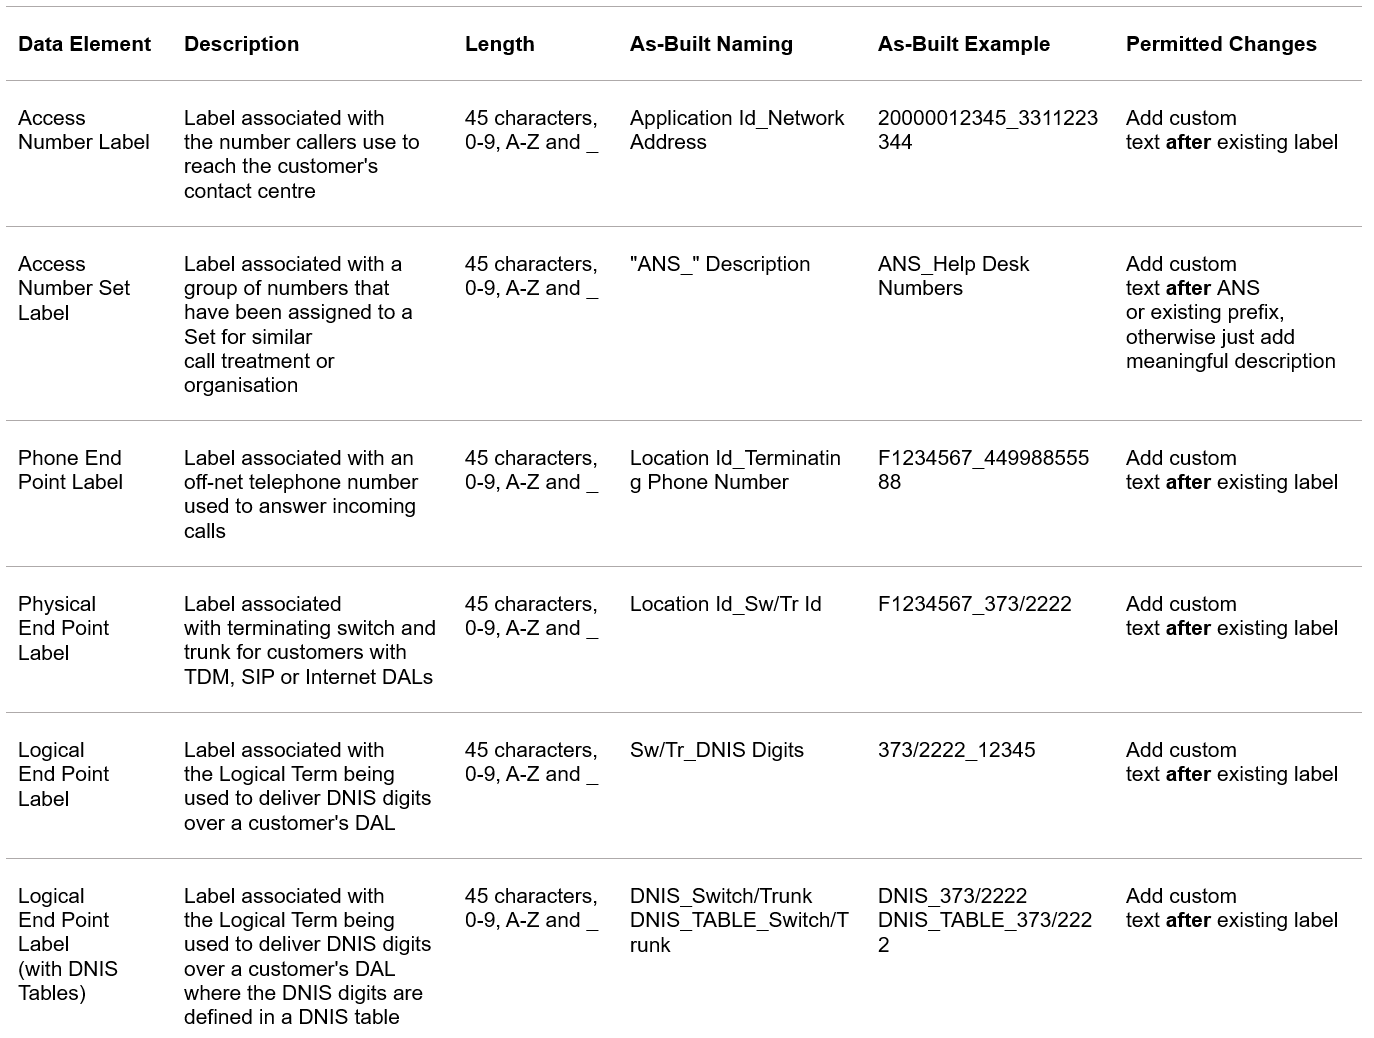
Labelling conventions
Every Inbound Contact global application is hand-built and tested to customer specifications. For ease of use, default naming conventions have been used on each customer element.
Some labels are manually updated, others are assigned automatically by the system. Consistent labelling improves searching and aids support teams during troubleshooting.
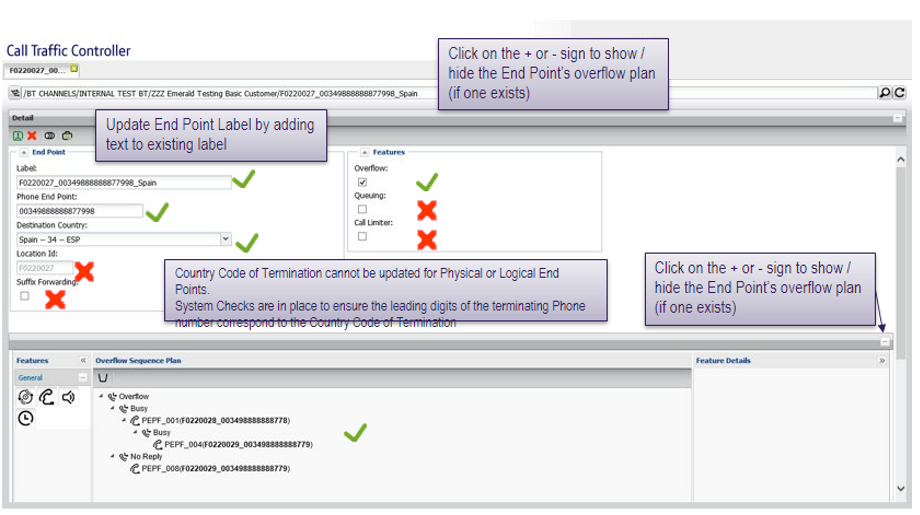
How to update labels
- To change a routing plan’s, access number’s or other element’s label, select it from the appropriate elements list and double-click to open it
- Click on the first branch element of the routing plan
- Edit the label using the feature details panel to the right

Controller home screen and navigation
The home page of Controller displays the Corp ID(s) the user has access to and the list of routing plans that have been modified in chronological order.
Labelling guidelines by element type – access numbers, sets and end points
Labelling guidelines by element type – routing plans, screening plans and elements

Call simulator
Call simulator is a special new feature of Call Traffic Controller found under the “references” menu. If you do not have call simulator on your profile and would like to have access, send a note to AskCTD@bt.com with your user details and request.
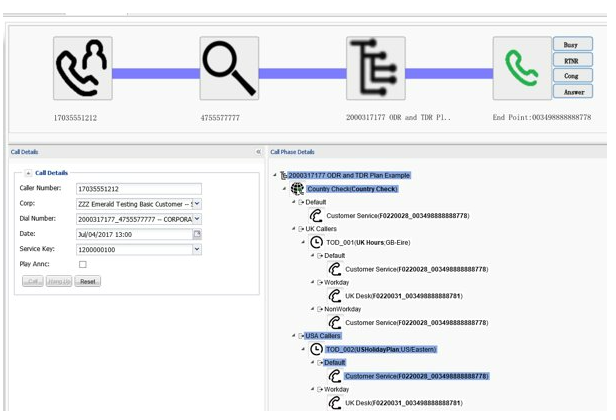
Call simulator prompts users to provide a calling number (or originating country code / number prefix), select the corporate ID and application ID to be tested and the time when the call is “made”.
When “call” is pressed the flow of the call and its corresponding screening and routing are displayed graphically.
Call simulator is useful for testing new routing plans, screening plan updates or to test different conditions for routing. Call simulator is not making actual network calls, but is meant to show a call’s intended route through screening, routing and/or overflow plans.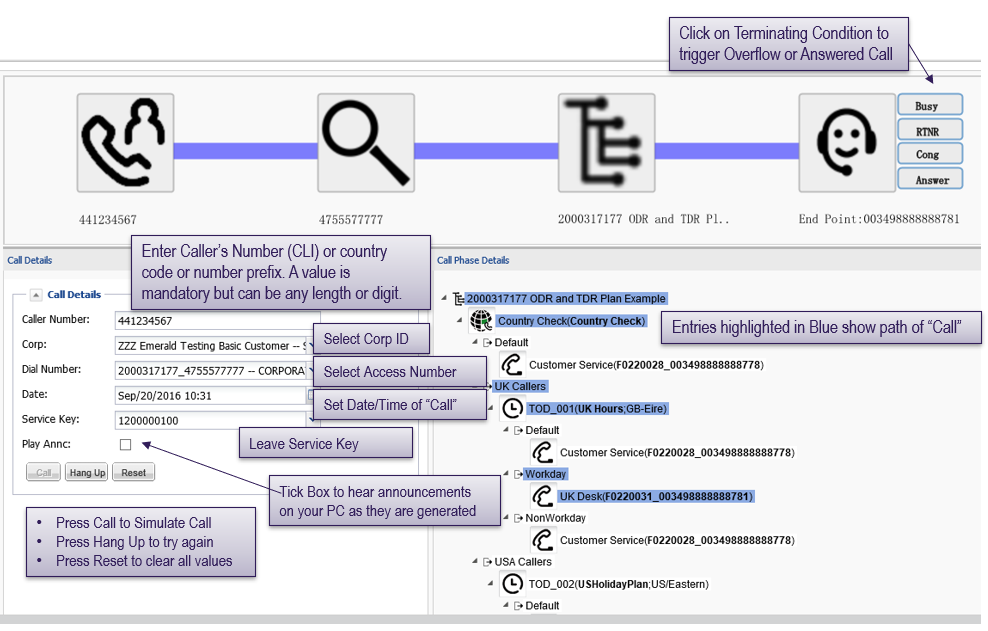
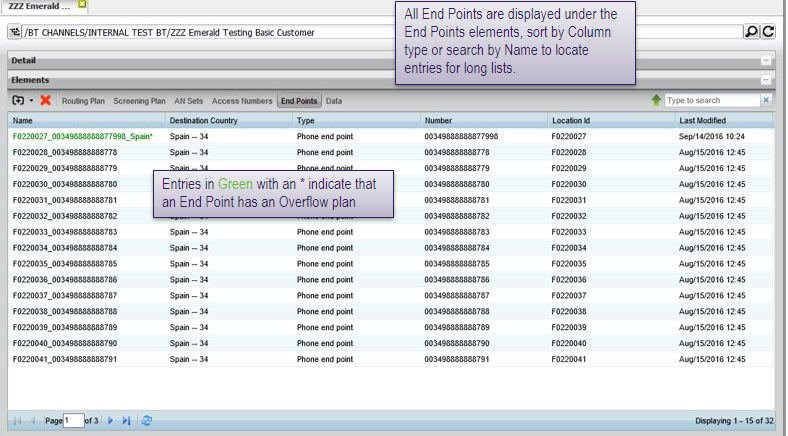
Customer elements
Once a corporate ID has been selected and opened by double-clicking, the customer elements are displayed.

Routing plan elements
The routing plan element shows all of the installed routing plans for the customer and their current status.

Routing plan details

Access number detail

End point elements list
Detail – phone end point
Detail – physical end point (TDM DAL)

Activating plans
Activating alternative routing plans
Inbound Contact global customers can have multiple routing plans assigned at multiple levels for maximum flexibility and customisation
- Access number level- a “set” is a group of access numbers specified by the customer, usually to indicate multiple numbers that serve a similar function, for example a set of software help desks.
Routing plans
- No limit to the number of plans assigned
- Each plan must be assigned to an access number, set or corporation
- Routing plans cannot route to another routing plan
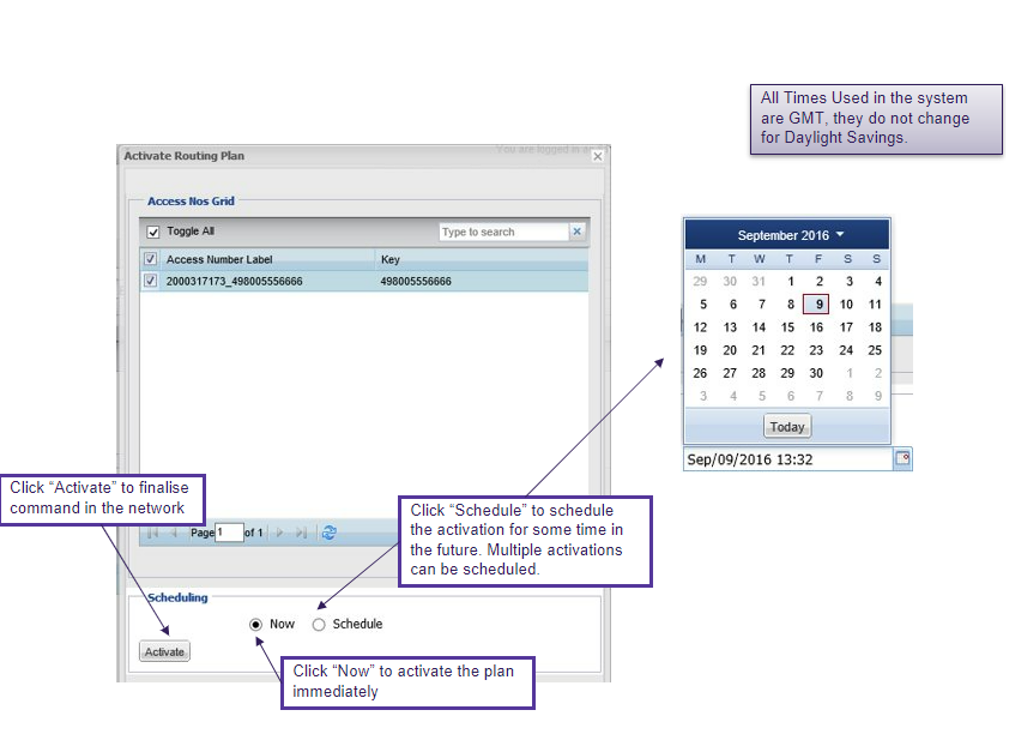
Routing plan activation
- Routing plans can be set for immediate activation
- Multiple plans can be activated at a single time
- Activations can be scheduled and can be stacked
- An “undo” function is available to revert back to the most recently activated plan
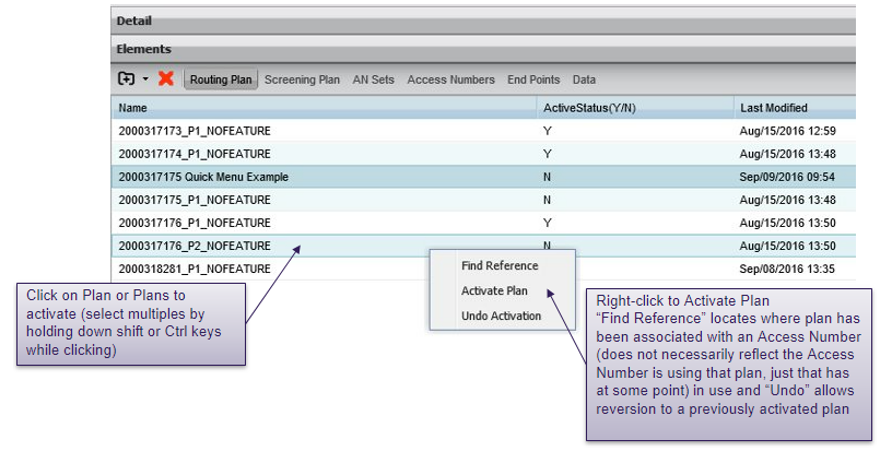
Activating plans – method 1
Plans can be activated directly from the routing plans element when viewing customer details.
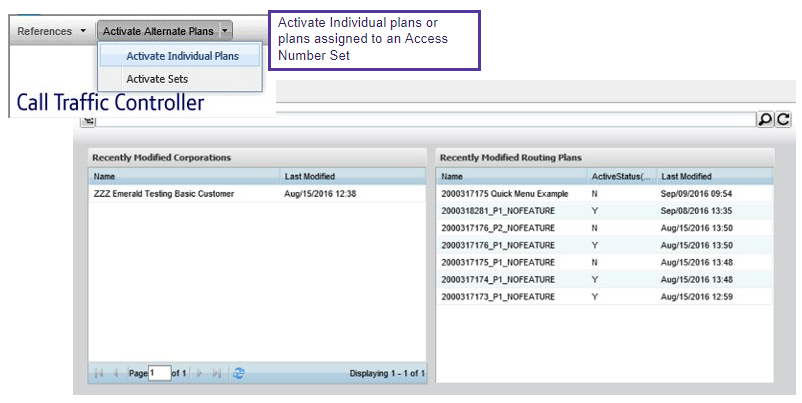
Activating plans – method 2
Routing plans can also be activated directly from the home screen by clicking the “activate alternative plans” button at the very top of the screen or by selecting a routing plan from the “recently modified routing plans” list on the right-hand side of the home screen.
Activating plans – method 3
Plans can be activated while viewing the details of an access number.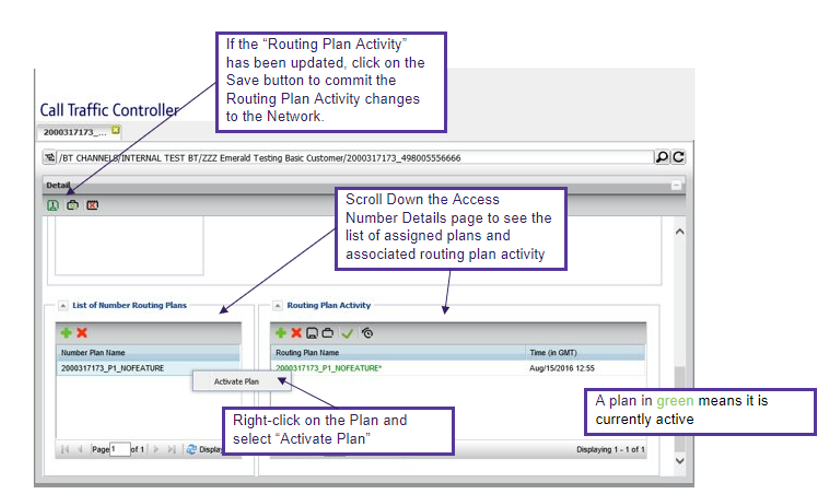
Activating the plan(s)
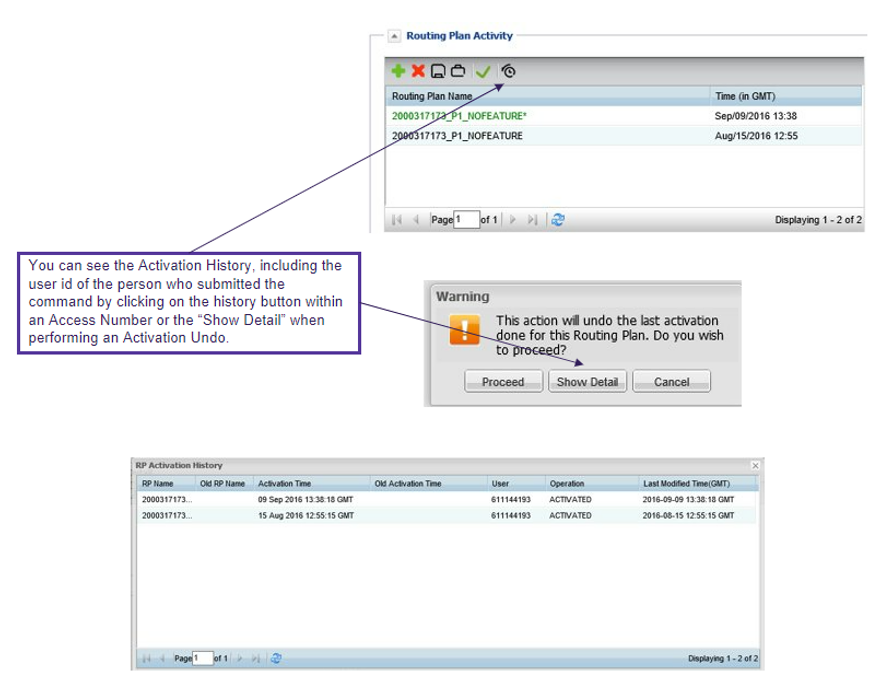
“Undoing” an activation
An activation can be “undone” or revert to the previously activated plan by right-clicking on a routing plan and selecting “undo activation”.
An access number must always have an active routing plans. Individual access numbers can be blocked or delivered to a release end point if they are temporarily not in use.

Activation history
Screening plan
Screening summary
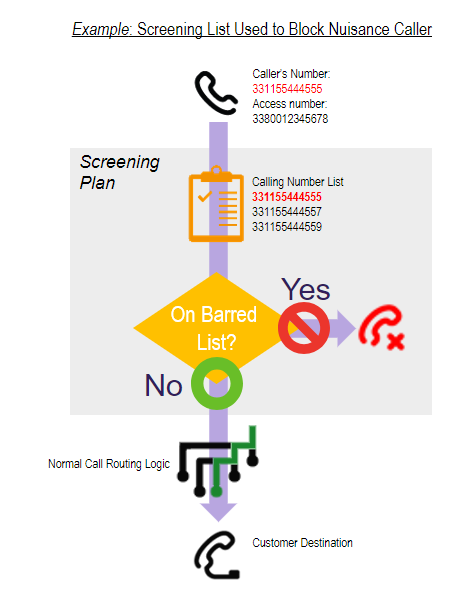
Principles:
User creates lists of blocked numbers or blocked number prefixes
- Allows barring by specific caller, an area code or country based on CLI
- Numbers can be added in real time directly on the system or entire lists can be uploaded using the bulk upload tool
User creates screening plan
- Selects the screening list
- Determines whether numbers are the list are to be barred or allowed to continue
“Barred” destination is selected
- Barred calls can go to a chargeable termination or to a “release end point” with no charge
Allowed calls continue to routing plan assigned to the access number as normal. Assign screening plan to an access number or access number set.
Screening in Call Traffic Controller
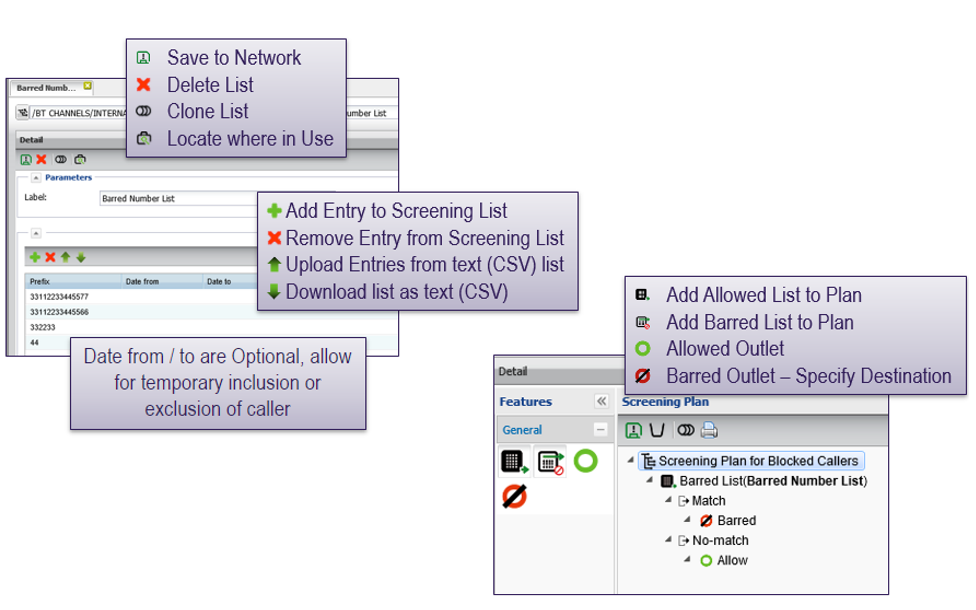
Adding screening to an access number
Screening plan is applied to all calls associated with access number. Screening occurs before the call is sent to a routing plan for delivery.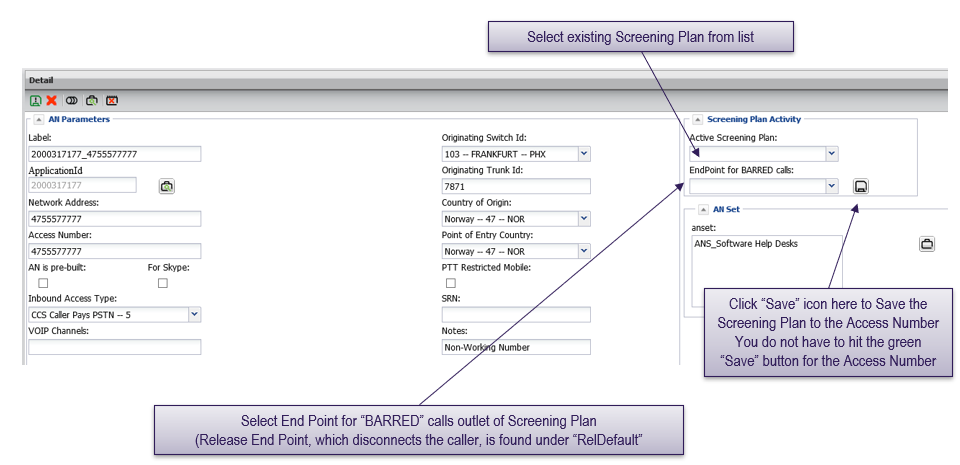
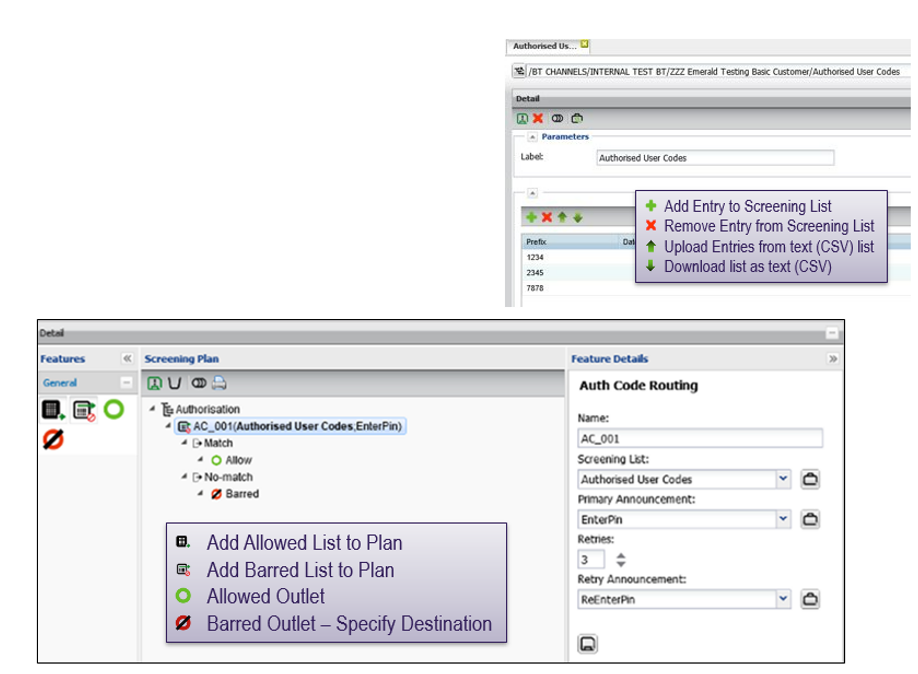
Authorisation codes
Authorisation codes
- Prompt callers for PIN number / code to proceed to destination
- Includes announcement for prompt and retry
- Add code lists live in system or bulk upload
Call stimulator view

Routing plan
Introduction
Routing plan defines the logic of how to process the call. Calls are routed in different ways depending on the requirements, available resources, load factors etc.
The routing plan tab shows the list of available routing plans and the date the plan was last modified. It also shows whether the plan is currently active or not.
Call routing
Call routing features allow customers to specify exactly how callers reach their contact centres.
Simple point-to-point, where every call associated with an access number terminates to a single location.
Complex routing for maximum customisation
- Time-based routing
- Origin-based routing
- Call distribution (“round Robin”)
- Uniform load distribution / maximum calls allowed
- Menu routing
- PIN routing
Some routing features can be included in a termination’s overflow plan
- Call distribution
- Uniform load distribution
- Time-based routing
Routing plan features
Point-to-point, all calls to an access number are routed directly to destination.
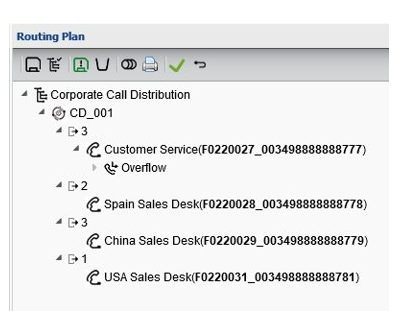
Call distribution / percent allocation
- Calls are distributed to different destinations in sequence based on customer specifications allowing different destinations to balance incoming call loads proportionately
Uniform load distribution / maximum calls allowed
- Sets the maximum number of concurrent calls permitted at a destination
- Calls over the specified limit can be sent to another destination or announcement
Time-dependent routing
- Specific date(s), day of week or time of day routing
- Times are programmed in GMT, daylight savings time supported if desired
Origination-based routing, routing configurations based on the call’s origin, down to the individual caller.
Quick menu routing
- Upload customised announcements
- Select prompts
Barred/allowed list
- Contains a lists of blocked or permitted caller numbers or number prefixes
- This feature is also available as a screening feature, which is applied before the call begins its journey through the network
PIN routing
- Callers have to enter a PIN before proceeding to the destination
- This feature is also available as a screening feature, which is applied before the call begins its journey through the network
Route call
Multiple features can be used within a routing plan. They can be assigned to an access number, set of access numbers or to the entire corporation.
Every access number is associated with active routing plan. Once built, a routing plan can be cloned, modified and applied to a different access number or set.
Routing plans in Call Traffic Controller
Call simulator view
Call simulator is an on-board tool that lets users replicate call conditions and view how the call would route through the network.
Creating and editing a routing plan
Click the add element button and select “routing plan” from drop-down list.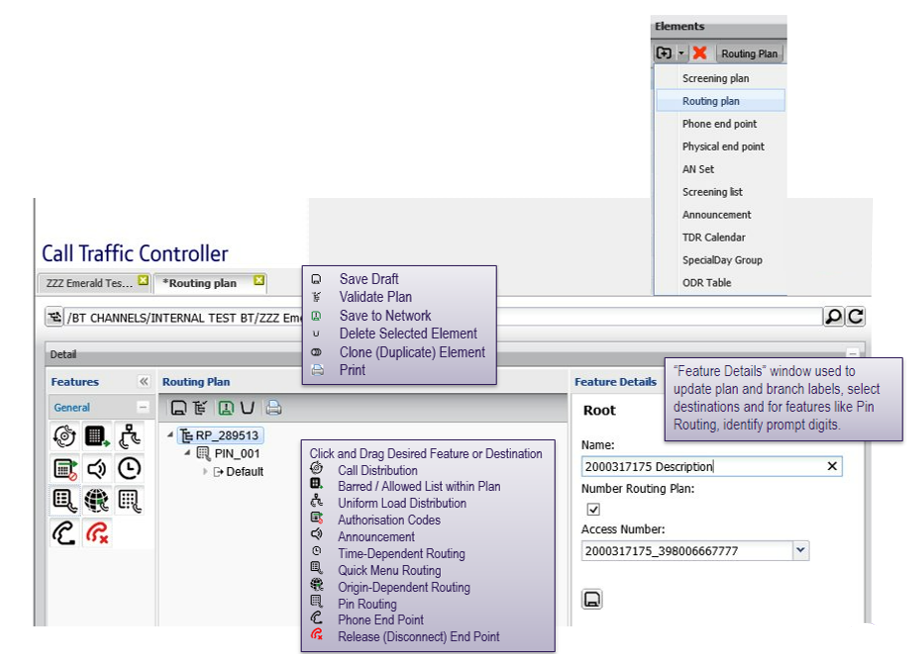
Outlet destinations
Routing plans are created by dragging a feature icon from the left-hand side of the screen to the routing plan tree graphic.
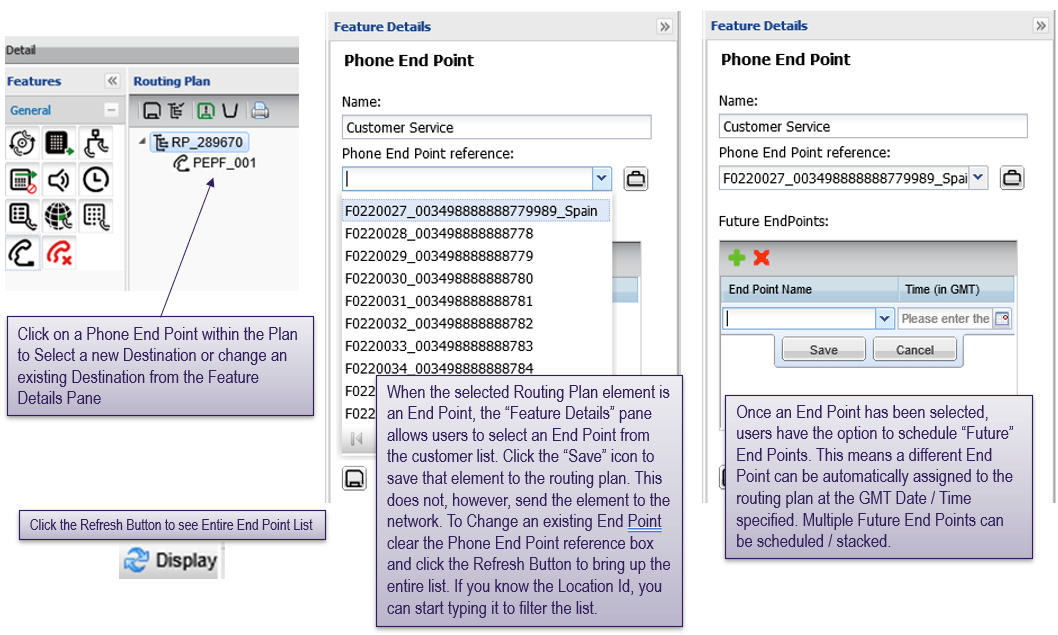
Using the “feature details” pane to change end point or schedule future end point change
Call distribution
Call distribution distributes calls in sequence to multiple destinations. They are delivered randomly to one of the destinations in the call distribution plan (unless it’s value is assigned a zero) and then in sequence, resulting in an allocated percentage of calls.
Algorithm has been improved to accommodate low volume of calls to ensure that each destination is receiving calls even if multiple call distribution routing plans are in use. However distribution may not exactly match, especially if there are low call volumes.
Call distributions can be set to zero (0) if a destination is not ready to receive calls or needs to be taken offline. This feature can be combined with other routing plan features, except uniform load distribution.
Uniform load distribution / maximum calls allowed
Uniform load distribution distributes calls in sequence to multiple destinations. Calls distributed round-robin (one to each destination) until the limit is reached at a particular destination, the limits are customised per branch.
The default destination must be a customer end point or auto contact announcement and cannot be a release (disconnect) or controller announcement. This feature can be combined with other routing plan features.
Time-dependent routing summary
Route calls by
- Calendar date
- Day of week
- Time of day
- In combination
Can be used with other routing plan features and can be added to destination overflow.
Daylight savings switching supported if required, all dates / times programmed in GMT.
Calendars and day of week / time of day tables maintained as separate references
- Same calendar can be re-used in multiple routing plans
- Calendars can be adjusted without having to update individual routing plans
Initial calendars / timetables built by BT for ease of use.
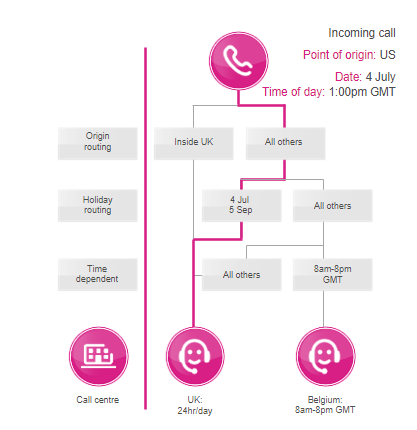
Time-dependent routing logic example

Time-dependent routing steps
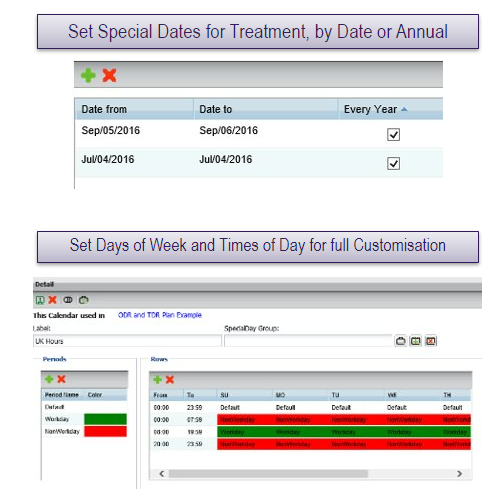
Create calendars
- Specify special dates
- Specify days of the week
- Specify time of day
- Set time zone and whether or not daylight savings adjustment is desired (optional)
- Calendars can be reused across different routing plans if desired
- For calendars using automatic daylight savings switching, the tables should be programmed in that timezone (not GMT)
Create / modify routing plan
- Add time-dependent routing feature
- Assign calendars
- Assign destinations to each outlet
- Another routing feature
- End point
“Auto” daylight savings option
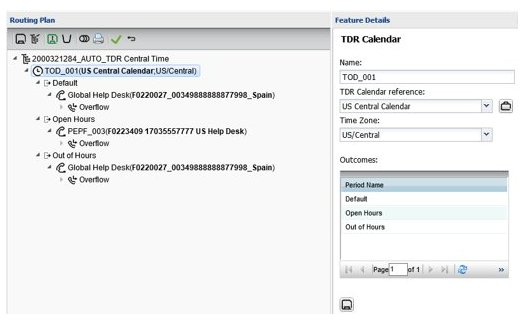
How to
- Create time routing tables (special dates or calendar)
- For TDR calendars, program the calendar in the timezone hours, not GMT
- Build routing plan and use the calendar corresponding to the timezone / desired routing
Select the timezone from the drop down to activate “auto” daylight savings. If the drop-down is left blank, the plan will not adjust to daylight savings and the calendar will be assumed by the system to be in GMT.
Timezone dates / times are programmed in the network using a Java script using publicly available Olson “tz” tables.
Useful when- customer wants an access number to be associated to a specific timezone and adjusts their contact centres to receive calls when daylight savings begins or ends.
Less useful when- customer has multiple end points in different timezones and wants routing to shift according to the end points’ timezones.
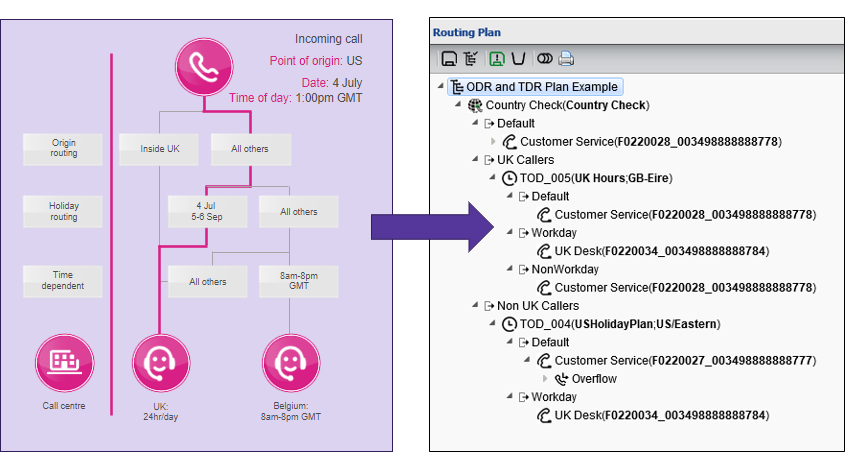
Origin-dependent routing
Routing by A-number / origination point.
Can route down to the individual CLI level or country code
- Full CLI: 17035551212
- Area code / region: 1703555
- Country code: 1
Origination tables maintained as separate references
- Same origination table can be re-used in multiple routing plans
- Origination tables can be adjusted without having to update individual routing plans
Initial origination tables built by BT for ease of use.
Origin-dependent routing
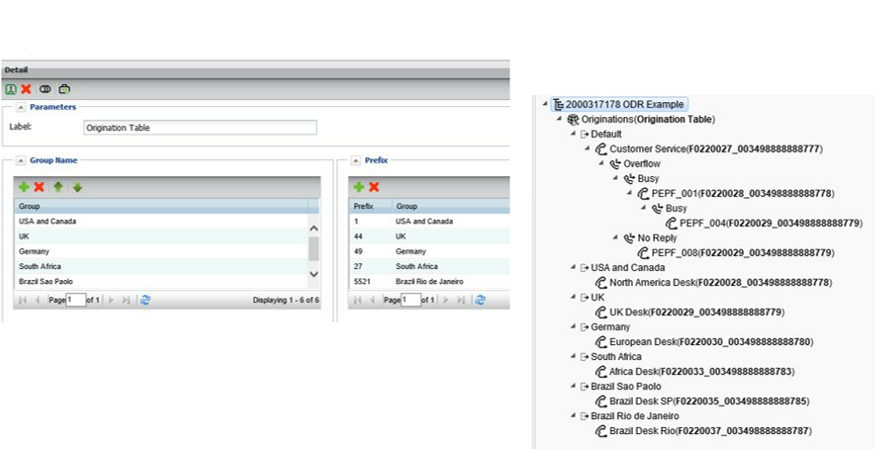
Create origination tables
- Custom “group”
- Group contain one or many country codes, numbers or number prefixes
Create / modify routing plan
- Add origin-dependent routing feature to routing plan
- Can be combined with multiple features
Quick menu routing
Quick menu routing allows customers to set up Interactive Voice Response menus without the need for a separate IVR application
- 2 levels of menus supported, more available upon operational approval (up to 4)
- 1 digit input supported, numbers and * or #
- Customers can specify number of retries (0-5) for invalid key presses as well as play a different announcement as a retry prompt
- After the number of invalid retry attempts have been exceeded, the call will be routed to the branch’s “default” destination
- If a caller does not enter any value, the original prompt will be repeated three times before routing the caller to the branch’s “default” destination
- Customers can upload own recordings to create or update menu prompts
Files must be 8 kHz, 16 bit, Mono, File Size <1.2Mb.
Quick menu construction
Quick menu can be used in combination with other routing plan features.
Specify digits (0-9 or * or #) and announcements to be played as prompts.
Specify output
- Destination
- Routing plan feature
Specify retry attempts and announcement to be played during a retry
- An announcement could consist of a recording that prompts the caller to try again followed by the original recording with menu choices
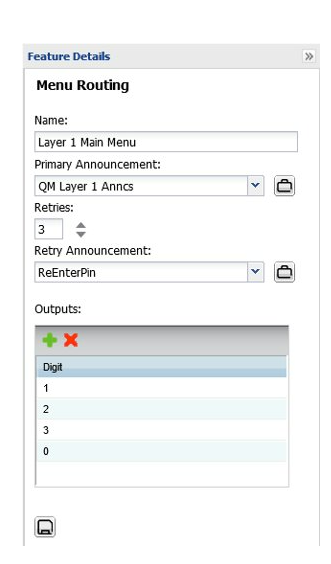
Quick menu example
This example shows a two layer quick menu plan
- 4 menu options
- Specify announcements for each layer
Specify output
- Destination
- Routing plan feature
Invalid responses are delivered to the “default” destination.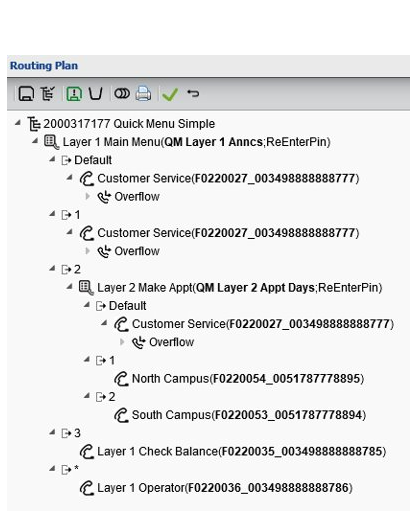
Screening features used as routing features
While not common, customers are able to add screening features within a routing plan. Examples include
- Screening on callers’ phone numbers when caller selects “pay my bill” from a quick menu entry to route high priority callers
- Prompting callers selecting a premium feature from a quick menu to enter a PIN number or authorisation code
PIN routing
Uses origination lists (ODR) to identify PIN numbers.
Play prompt and retry announcements
- Default outlet: calls not matching PIN list after number of retries specified for the PIN routing details
- When the caller enters digits that do match an entry on the PIN ODR list, they are routed to a destination or other routing feature as specified in plan
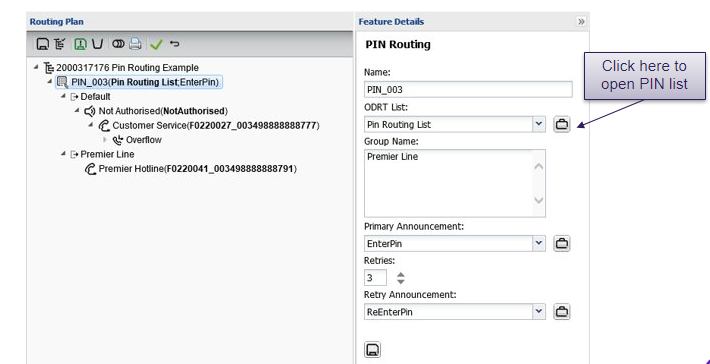
PIN routing – update PIN list
To add entries to a PIN list, open the list from the “data” elements list or click on the suitcase icon from inside the feature details of the routing plan.
PINs are assigned to a specific group, which is used as the outlet inside the routing plan so PINs can be assigned to a single or multiple groups.
Add PINs one at a time by clicking on the green + button or by bulk uploading a list using the upload arrow.
The bulk upload list only needs to contain the relevant PIN list as a text file, the PINS are bulk uploaded to the selected group.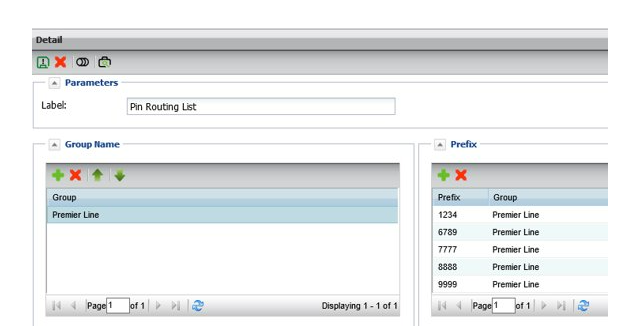
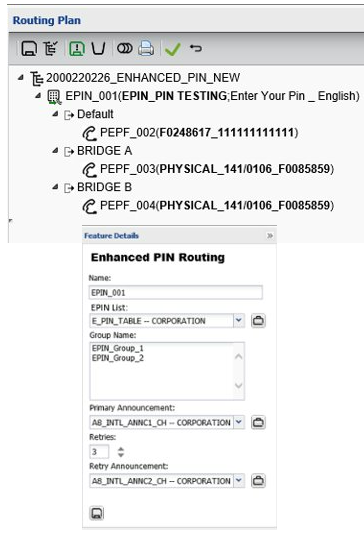
Enhanced PIN: using caller-entered PIN as DNIS digits
Enhanced PIN is a feature that will deliver caller-entered PIN digits as the DNIS digits.
Requirements
- Announcement to prompt the caller to enter PIN digits
- PIN list with specific PIN lists or PIN prefixes
- Default destination for callers who do not enter a PIN
- The Sw/Tr (physical end point) where the call will be delivered
In this case, calls aren’t delivered to a logical end point (DNIS), but rather the Sw/Tr itself.
Enhanced PIN can be used as the final routing plan node or can have an optional call distribution node.
The physical end point being used for delivery may have its own overflow (built at the parent physical end point).
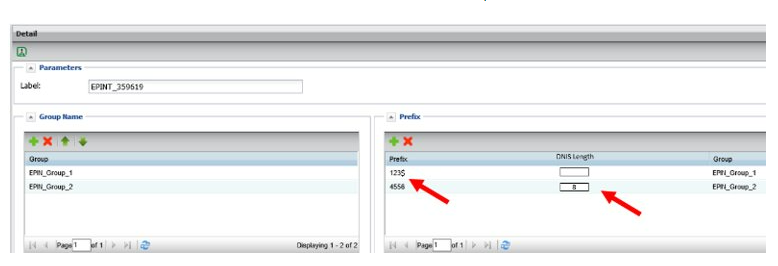
Enhanced PIN – PIN lists
An enhanced PIN list is similar to a regular PIN list, however individual PINs do not need to be listed. The PIN list support the use of a $ wildcard, allowing the use of a PIN prefix and not requiring an exact match in the PIN list.
An optional DNIS length can be included, which will stop the caller’s entry of the PIN once it reaches the correct length.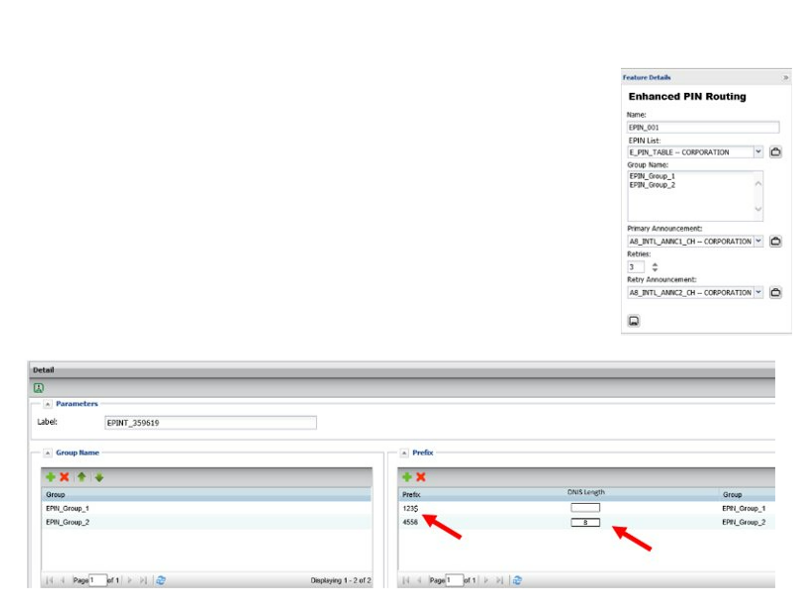
Enhanced PIN list detail
Enhanced PIN matching logic. Exact match or partial match (leading digits) when trailing $ is configured. Exact match has precedence over leading digits. For example:
- PIN table contains 123456 and 123$
- Caller-entered digits are 1234567 are matched against 123$
- Caller-entered digits are 123456 are matched against 123456 (exact match)
- Caller-entered digits are 12345 are matched against 123$
- Caller-entered digits are 123 are matched against 123$
- Caller-entered digits are 12 are not matched
- DNIS delivery is controlled by the enhanced PIN list’s “DNIS length” field
Length may be any integer between 1 and 15
- That number of 1 to 15 trailing digits of the entered PIN are passed to the termination as the DNIS
- If a DNIS value is not set in the enhanced PIN list, the full PIN is passed to the termination as the DNIS
Announcements
Introduction
Announcements can be played any time during the screening or routing journey depending upon the feature being used and the outlets selected
- Announcements telling the caller to hang up or otherwise triggering a caller disconnected can be used “mid-call” as part of a quick menu feature or as an endpoint
- Controller announcements should not be used on high volume numbers as end points
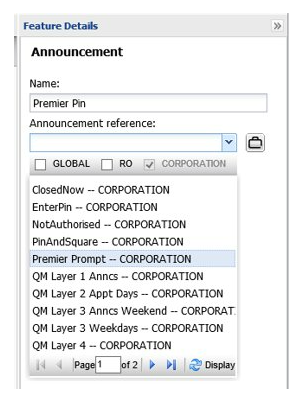
Announcements are created by selecting a recording and adding labels and other identifying information. Multiple recordings can be included in an announcement.
Global and revenue-owner specific announcements may be used by customers. They are professionally-recorded generic messages.
Customers may upload their own recordings for use in announcements
- Files must be 8 khz, Mono, 16 bit, <1.2Mb file size
- Files must be uploaded in .wav format
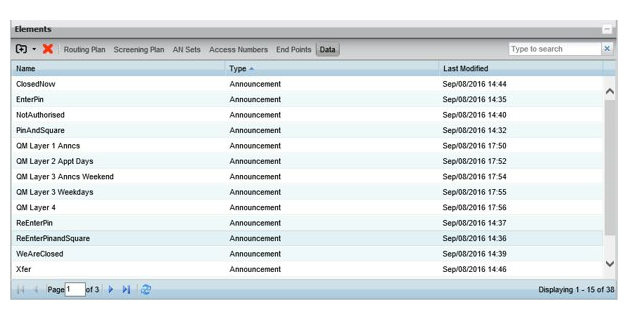
Finding announcements
Existing customer announcements are found under the “data” list
- Recordings are listed with their 8 digit system identifier
- This identifier cannot be customised
- Recordings can be played when viewing or creating an announcement for verification
The data list also includes ODR, TDR and screening lists
- Click on “type” to sort by data type
- Double-click on announcement to modify it or listen to the associated recording(s)
Building announcements
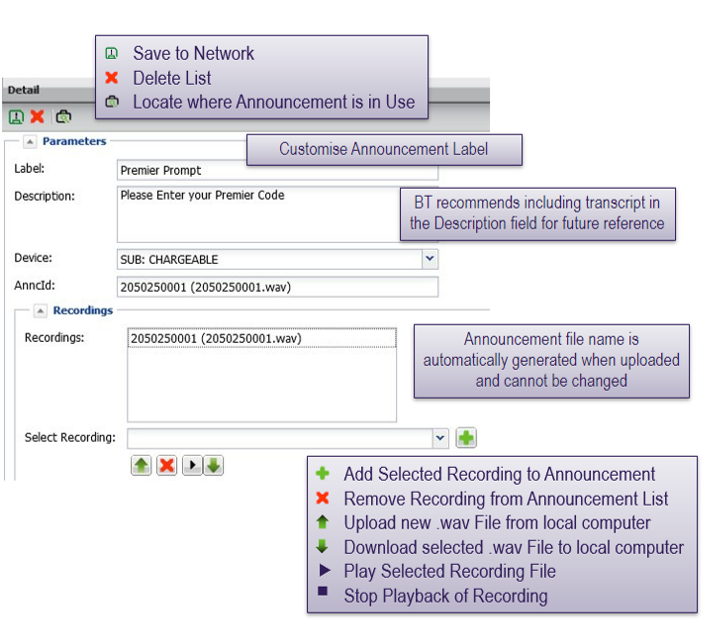
Using announcements
Select announcement from list when editing a feature that is using an announcement or when using an announcement as an end point.
Features that uses announcements
- Authorisation codes
- PIN routing
- Quick menu routing
Other announcements
- Play an announcement before an end point, for example: “please wait while we contact an operator”
- Use an announcement as an actual end Point- “please call again later".
Call delivery
Types of call termination
Phone end point
- Off-net PSTN number
- Regulatory rules prohibit some call combinations
Physical end point
- Dedicated access line (DAL)
- Provisioned by BT
- Designated by location ID and switch / trunk address, which is unique to each DAL
- TDM DAL (E-1, T-1 etc.)
- SIP DAL (ordered via separate process)
- Internet DAL (launched summer 2016, limited availability)
Logical end point
- Customers can customise the delivery digits associated with calls terminating at any type of DAL
- DNIS digits (Dialled Number Identification Service)
- DNIS tables can be loaded in bulk
Announcements
- Calls cannot be terminated to an announcement uploaded into controller
- Announcements can be played prior to delivery to an end point
Termination features
- Call overflow
- Multiple hops
- Call distribution or time-dependent routing can be used as part of a termination’s overflow plan
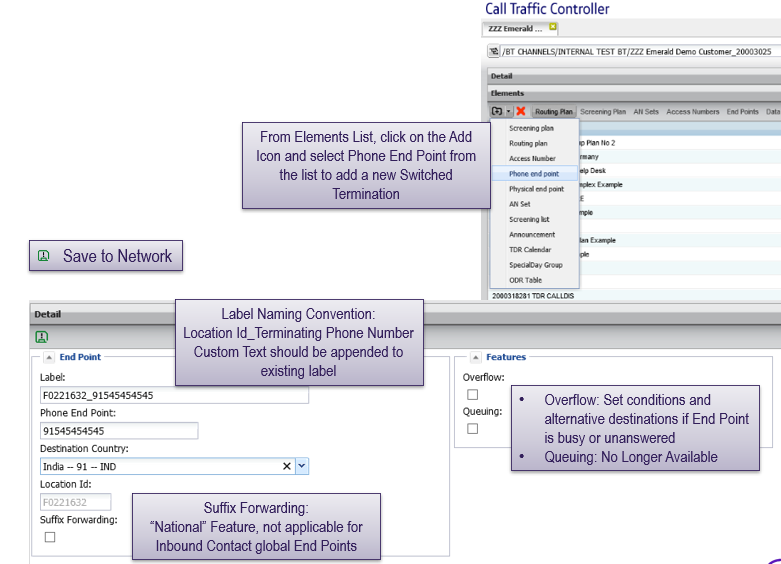
Phone end points
Phone end points are PSTN telephone numbers used as destinations in routing plans
- Rarely, some routes are restricted by regulatory regulations within the country. Only phone end points in the countries listed on the following slide are permitted
Phone numbers are created in International format. Examples:
- 44331555666 (UK PSTN)
- 17778988888 (USA PSTN)
Phone numbers are assigned a location ID in the system that cannot be modified. Lists of phone end points can be bulk uploaded to the system. Format: phone end point (in international format), originating country code. Example:
- 918001234567,91
- 44207222333444,44
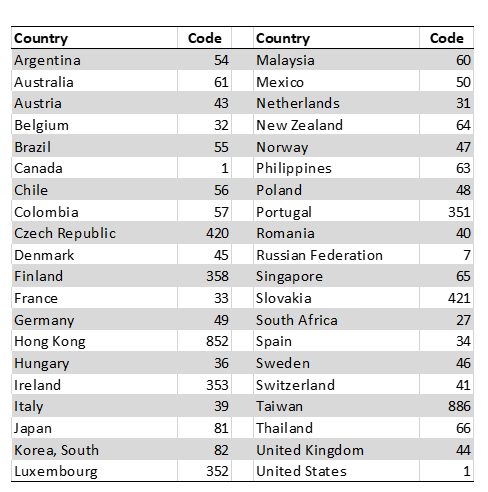
Permitted phone end point country list
For countries not on the list, an Inbound Contact global order must be submitted via the MVS order team to ensure route availability and continuity of service.
Special note for Canada:
- Canada has a Pseudo country code of 838 in the system
- Phone end points for Canada should be built with the actual dialled number (eg 1236xxxxxxx) with Canada as the terminating country
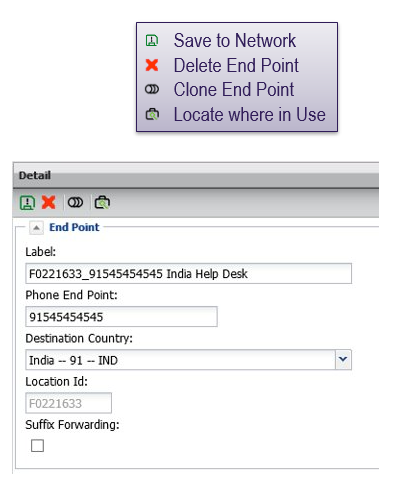
Creating phone end points
Modifying phone end points
A phone end point can be modified by double-clicking on it from the elements’ end points list. The system will warn you if the number is in use to prevent accidental changes.
Changes to the termination will impact all routing or screening plans using that termination, individual routing plans do not need to be updated.
Physical end points
Fields cannot be modified by customer users.
Identifies network address (switch / trunk ID) of physical termination as well as features specific to the DAL and identifies DAL type.
Supports CLI delivery restrictions (send / block / overwrite with country code).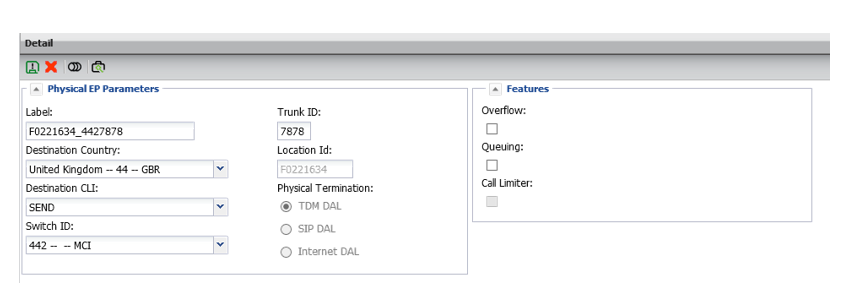
Logical end points (DNIS delivery)
Logical end points are associated to an individual physical end point and specify the digits to be delivered along with an incoming call. This service is also known as DNIS (Dialled Number Identification Service).
Logical end points are treated like any other end point for call routing purposes, allowing for full customisation and determination of outpulsed digits to dedicated termination.
Format: phone end point (in international format), originating country code. Example: 44207222333444,44
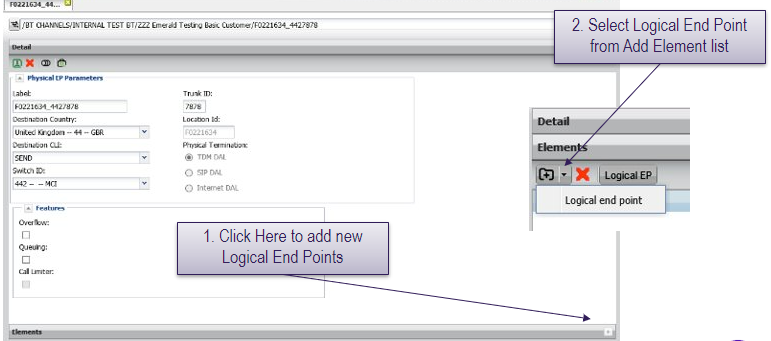
Creating / modifying logical end points
Logical end points can only be used by customers who have a physical end point already installed.
Add logical end points by opening the physical termination and clicking the + button on the elements bar at the bottom of the screen.
Logical end point creation (no DNIS table)
New logical end points can be bulk uploaded or added one at a time via the system interface.
Open the parent physical Sw/Tr and click on the “elements” button at the bottom of the page.
Labeling convention: Sw/Tr_Digits (eg 442/7878_12345). BT recommends maintaining this labelling convention or other consistent convention specific to the customer, this makes searching for logical terminations much simpler from the end point elements.

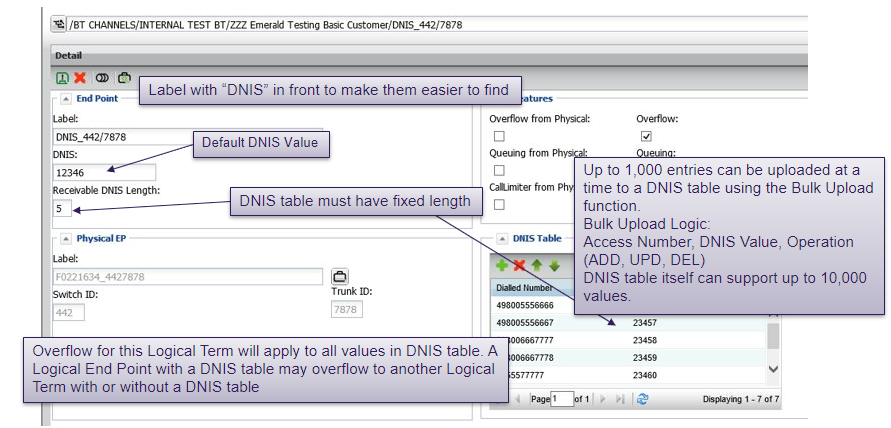
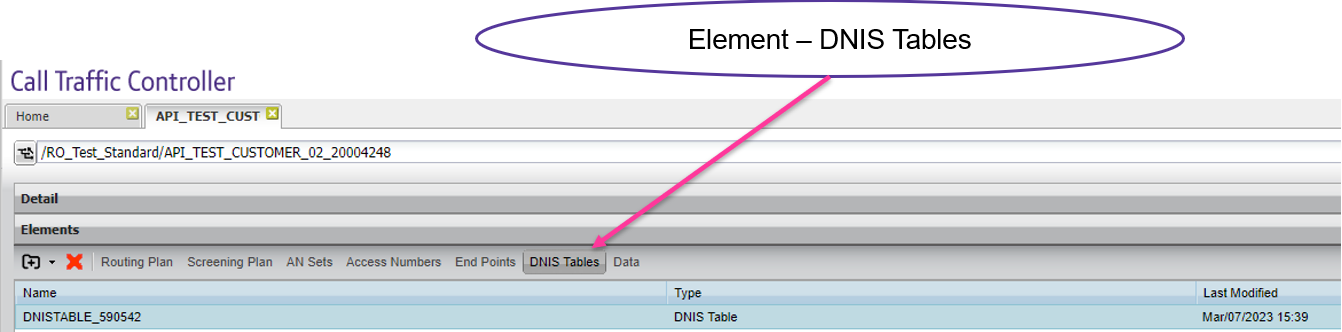
Logical end points – DNIS tables
DNIS tables are optional and are mostly used by customers with large amounts of access numbers that wish to specify exactly which digits get outpulsed when a call is received.
Rather than build an individual logical termination for every potential DNIS value, a DNIS table allows for bulk updating and routing from a single logical end point.
When a call is routed to a logical termination that has a DNIS table, the access number value dialled by the customer is matched against the values in the DNIS table
- Match: outpulses digits specified in table
- No match: outpulses digits specified for the logical end point
Logical end points - DNIS tables (optional)
DNIS tables are an optional feature used to streamline DNIS digit delivery for customers with many access numbers and many corresponding outpulse digit values.
Only fixed-length physical end points are supported at this time.
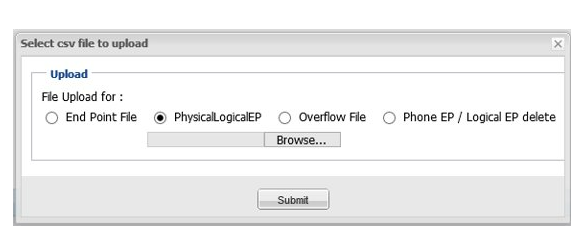
Bulk uploading DNIS tables
Controller has made changes to how DNIS tables can be maintained and updated to add an “operation” field to an offline table that can be uploaded to the network for use as a DNIS table.
DNIS table files will have to include a column to identify the “operation”:
- ADD for new entries
- UPD when making a change to an existing entry (only the DNIS values can be modified, not the access number entry)
- DEL to remove an entry
For a single DNIS table
- The .CSV format will include a 3rd column:
- Dialed Number in column A followed by DNIS value in column B (1-15 digits) followed by 1 of 3 operations in column C
- The file is uploaded for the individual DNIS table, per current process
Changing multiple DNIS tables or changing a single DNIS table from the corporate page
- The .CSV format has 4 entries:
- The logical end point name, followed by dialed number in column B followed by DNIS value in column C (1-15 digits) followed by 1 of 3 operations in Column D
- More than 1 logical end point can be in a file. For example:
- LEP_1,31212121212,1231,ADD (this entry adds DNIS table entry in logical end point “LEP_1”)
LEP_2,5673453433,7564,UPD ( this entry updates DNIS table entry in logical end point “LEP_2”)
LEP_3,456464646464,7564,DEL ( this entry deletes DNIS table entry in logical end point “LEP_3”) - The file is uploaded from the “end points” list, click on the green “upload .csv file” arrow. You will see a pop-up box, where you select “DNIS upload”
Logical end point- corporate DNIS (optional)
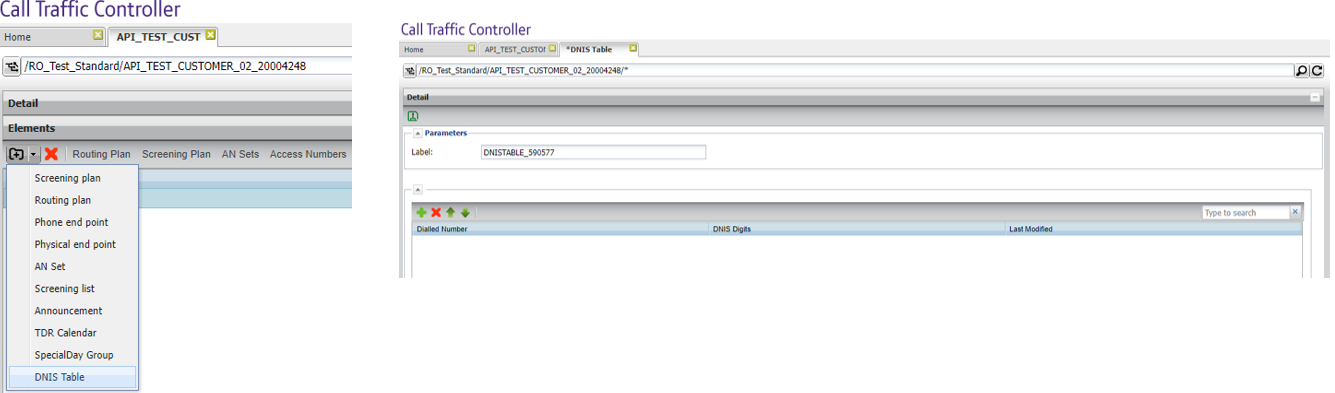
Optional- create a new corporate DNIS table
Click on the add element button (users must have “emerald” level privileges or higher) and select “DNIS table” option.
The label can be any value, but must be unique and the DNIS table, corporate or embedded, should not.
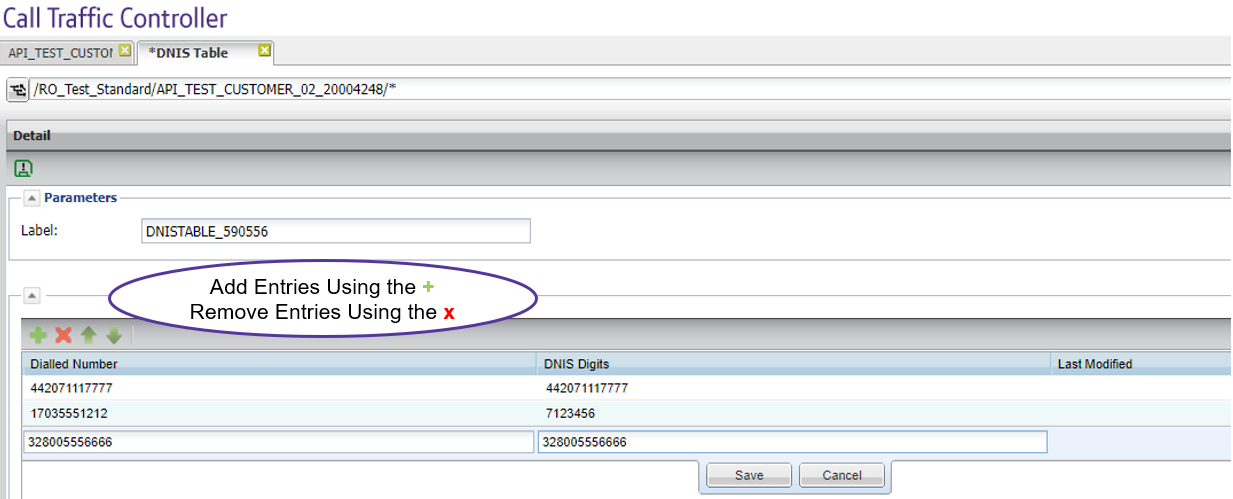
Add DNIS entries to a new or existing corporate DNIS table
Entries can be added/ removed manually one at a time or bulk uploaded. DNIS entries can vary in length.
Note: DNIS limited to 11 digits if enabling SIP Header.
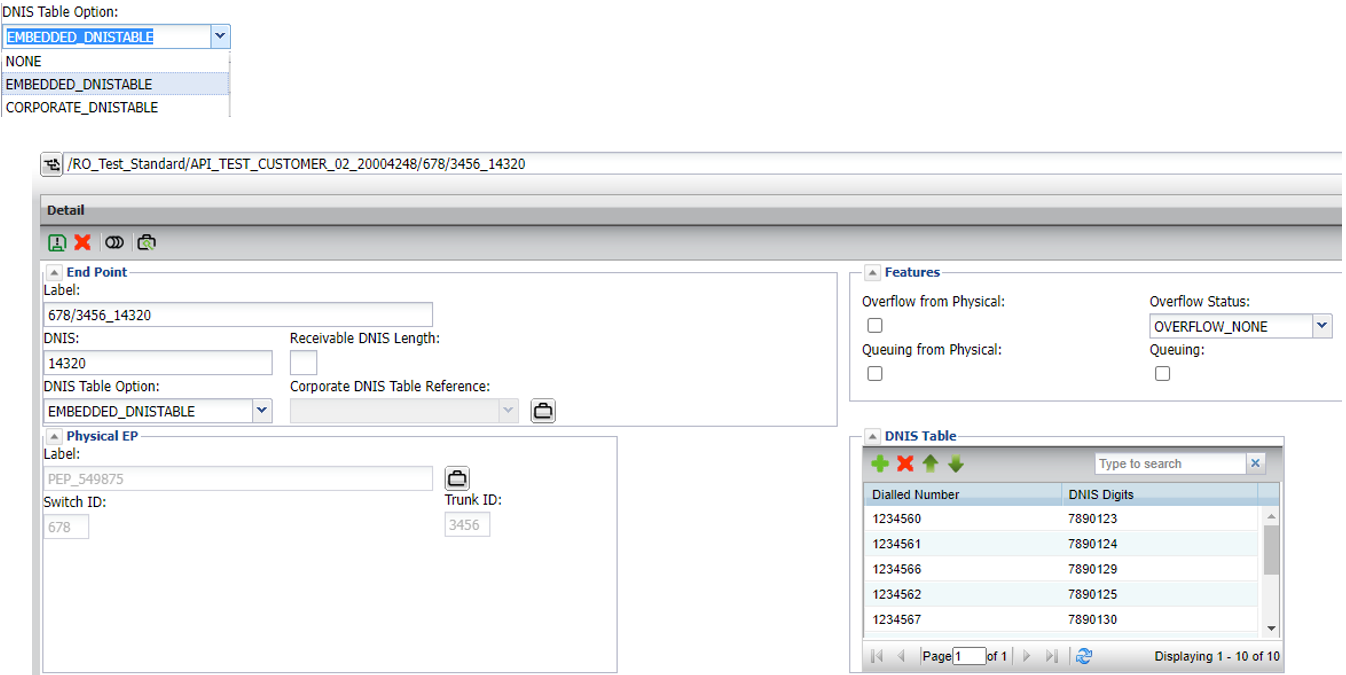
Normal logical end point
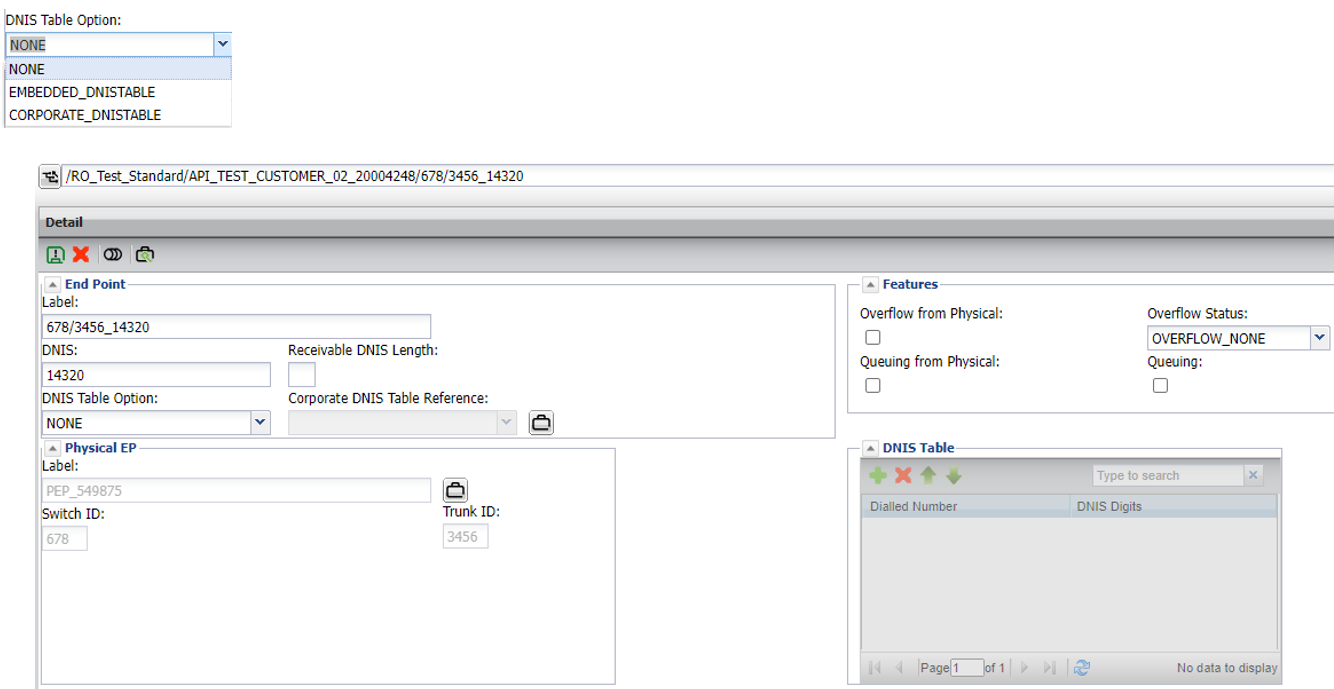
Embedded DNIS table- table belongs to logical end point
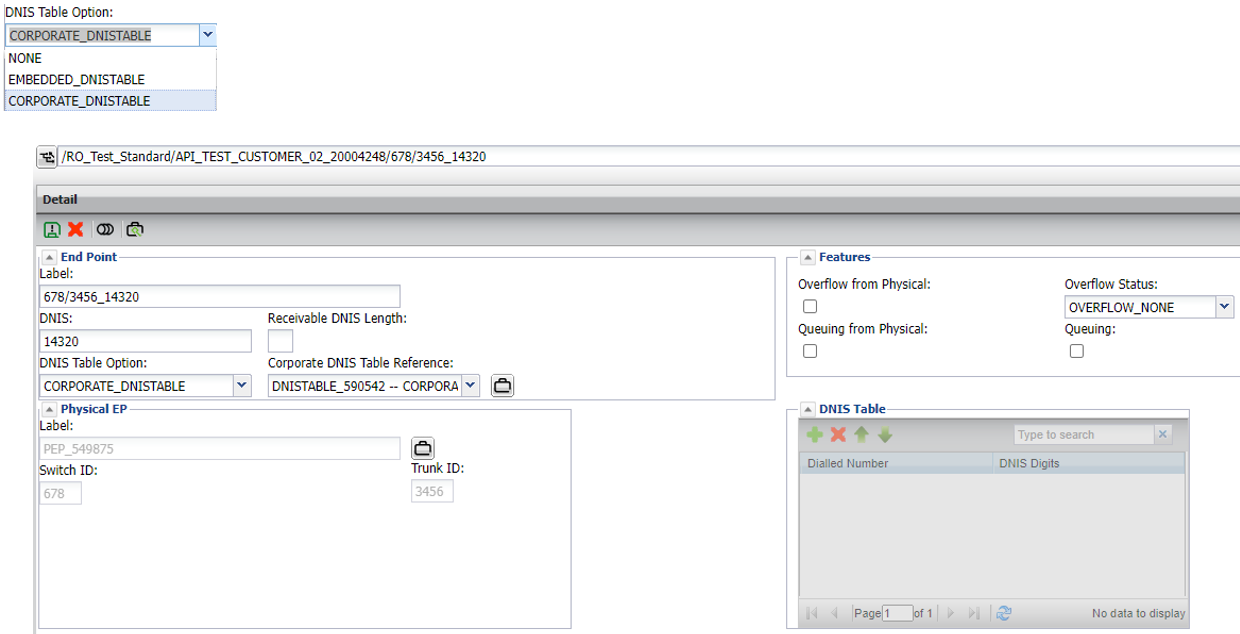
Corporate DNIS table
Call overflow
Call overflow is a feature that lets customers deliver call to an alternative destination under three different conditions, all of which may be treated differently.
- Busy – end point busy. For SIP DALs, codes 500 and 503
- Ring-no-Answer (RNA) – Call is unanswered after 30 seconds (about 5 rings)
- Network congestion – The network is unable to deliver the call to the intended destination
Calls can overflow up to 10 times and features can be used in between overflow hops
- Call distribution
Route calls to multiple overflow destinations as the come in to avoid flooding a single destination - Time-dependent routing
Route calls to multiple destinations based on the calendar dates, day of week or time of day (GMT)
Release end point
A release end point is a special termination that is used to end a call before it has been delivered.
Calls that end at a release end point are not billable and show up as incomplete calls in traffic reporter.
Release end points are most often used
- During screening to reject nuisance callers without further delivery or cost
- After an announcement destination (results in billable call for the time spent in the announcement)
Labels for release end points cannot be edited.
Access number management
Access number sets
Access number sets is a group of access numbers that can be organised to have a specific routing or screening treatment
- Numbers are organised in a table designated the plan to be activated when the set is activated
- Routing plans can be individual app-ID level plans or corporate plans or a mixture of both
Sets are an optional way for customers with a large amount of access numbers to group them together
- All software help desk numbers
- All flight reservation desks
- Emergency backup plans
Creating an access number set
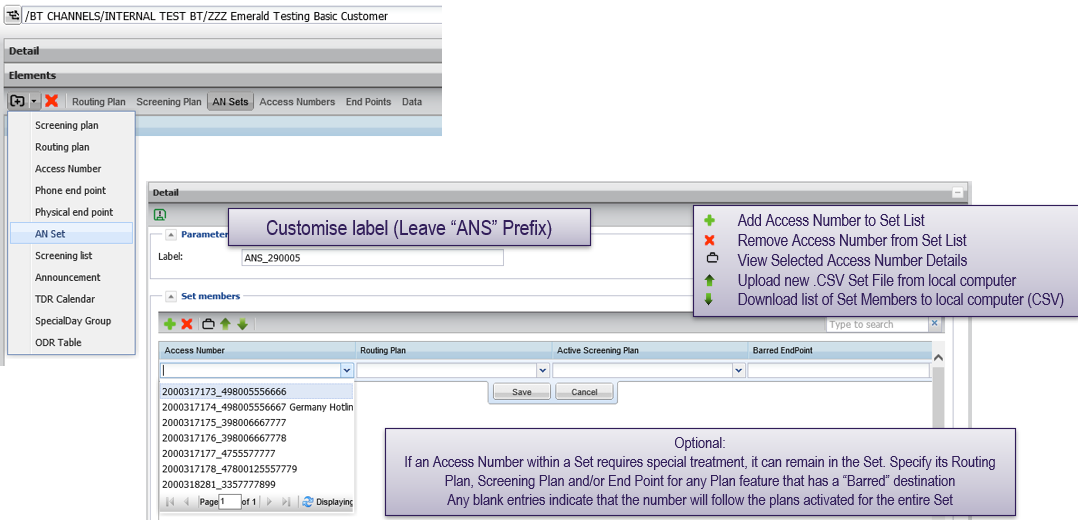
Create an access number set by clicking the add element button and selecting AN set from the list.
Click + to add an access sumber to the set. A set must have at least one access number, and no more than 2,000 access numbers.
Set details can be uploaded in bulk from a CSV file
- Access number, routing plan name, screening plan name, end point, names are optional, but must match what is provisioned in the system
- Bulk uploads cannot contain more than 1,000 entries, a set cannot have more than 2,000 total entries
Using access number sets
Once a set has been saved to the network, it can be treated as an individual unit, just like an access number.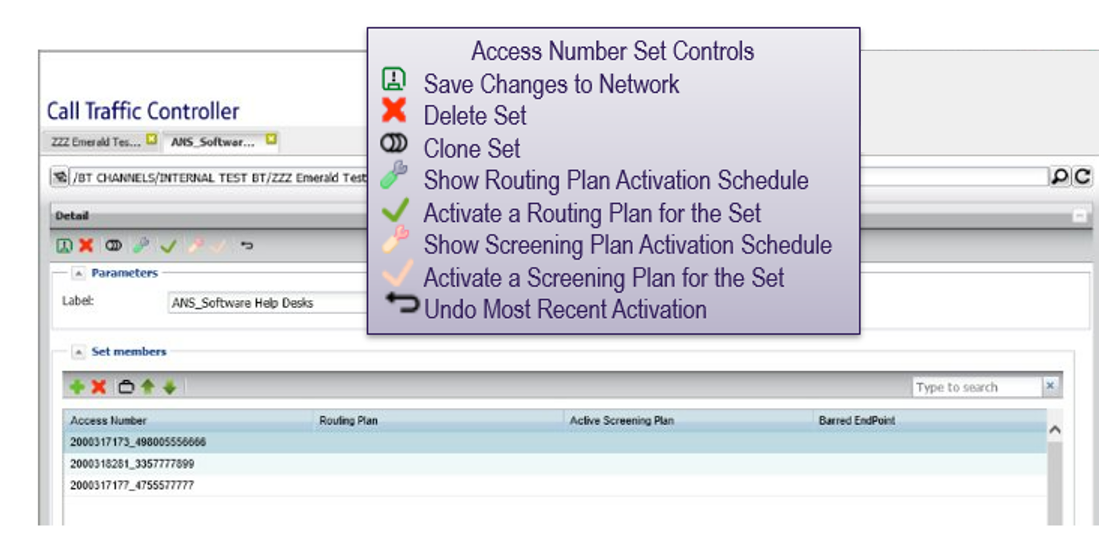
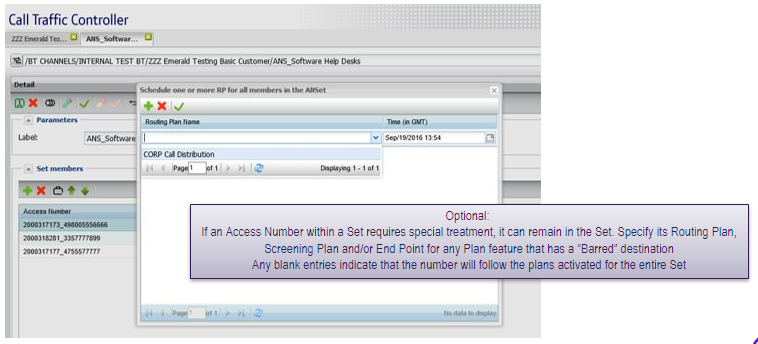
Activating plans for a set method 1: from within a set
Clicking on the “spanner” icons brings up the plan select window for the set
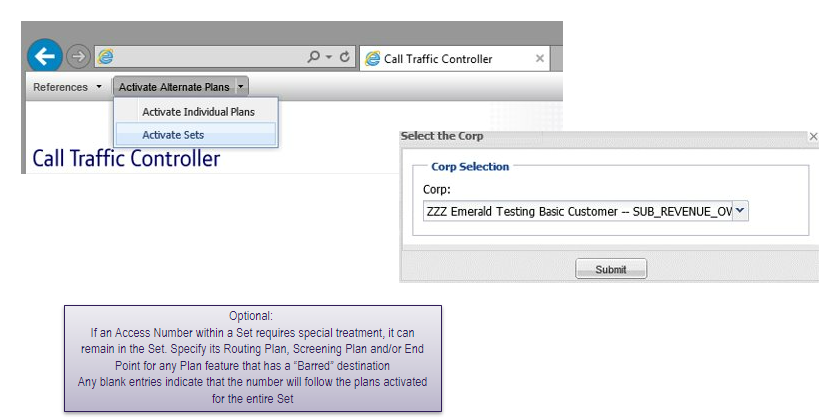
- The scheduled plan added to the list will be applied to the entire access number set, which will override any individual access number level plans specified in the set
- Use the green tick to revert back to the routing / screening as specified within the access number set table
- Access number entries without any entry will revert back to the routing plan already assigned to the access number (the current routing plan associated with an access number can be verified by viewing the access number and scrolling down to see the current active plan)
Select the routing or screening plan to be activated and the time when it should be activated and click on the green tick to activate. Multiple plans can be included in the list for activation at a future time.
Activating plans for a set method 2: from title bar
Click on activate alternate plans from the title bar and select “activate sets” and select the corporate ID that owns the set.