Set up a Cloud Voice Express analogue phone adaptor
The Cisco ATA 191/192 analogue phone adaptor is designed to work with your BT Cloud Voice Express service. It’s a smart piece of kit that means you can continue to use most analogue devices currently connected to a traditional phone socket on a digital phone line.
Here’s how to set up your Cloud Voice Express analogue phone adaptor (Cisco ATA 191/192) and use it to connect things like caller ID devices, faxes, and warehouse bells to Cloud Voice Express.
1. Make sure your service is working first
Before you set up your Cloud Voice Express analogue phone adaptor, you need to make sure that Cloud Voice Express and broadband are both up and running.
If you’ve just bought Cloud Voice Express, please wait for our email confirming it’s working.
Once you’ve received the confirmation email, check there’s a blue light on your Hub to show your broadband’s connected.
When both broadband and Cloud Voice Express are working, you’re ready to set up your Cloud Voice Express analogue phone adaptor.
2. Connect the cables
- Plug the cable from your analogue device (such as a fax machine) into the PHONE 1 port on your Cloud Voice Express analogue phone adaptor. You may need to use the phone socket adaptor included in the box.
- Next, plug one end of an Ethernet cable into the NETWORK port on the Cloud Voice Express analogue phone adaptor. Plug the other end into the Ethernet port on your Hub.
- Then, plug the supplied power adaptor into your Cloud Voice Express analogue phone adaptor.
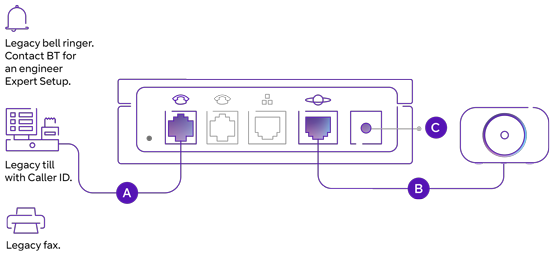
Note: If you have the Cisco ATA 192 analogue phone adaptor, it also has a LAN ETHERNET port. You don’t need to use this when setting up for Cloud Voice Express. However, you can use it to connect to a device on your network, such as a computer, with an Ethernet cable.
3. Switch on your Cloud Voice Express analogue phone adaptor
When you switch on your Cloud Voice Express analogue power adaptor, it’ll connect to your Hub automatically.
Within a minute, you’ll see two green lights on your Cloud Voice Express analogue phone adaptor, which means both the power and the network are connected.
The third green light should flash and then remain on. This means your service is ready to make and receive calls.
If the third green light continues to flash
Your number should be assigned automatically, but if the third green light continues to flash you may need to assign a number to the device.
To assign a number to the device:
- Log in to My Account.
- When you’ve logged in, go to Manage your services.
- Then, go to Cloud Voice Express and select Launch now.
- Next, select Settings and choose the number you’d like the Cloud Voice Express analogue phone adaptor to have.
- Now, select Assign device.
- Then tick the box for the Cloud Voice Express analogue phone adaptor (Cisco ATA 191/192).
- Finally, select Confirm.
You’ve now assigned a number to your Cloud Voice Express analogue phone adaptor.
4. Use your Cloud Voice Express analogue phone adaptor
After you’ve assigned a number to your Cloud Voice Express analogue phone adaptor, it’ll restart automatically.
Your Cloud Voice Express analogue phone adaptor will then display three green lights – none of them will be flashing this time. This shows everything’s connected correctly.
By connecting an analogue device (like a fax machine) to your Cloud Voice Express analogue phone adaptor, you can use it with your digital phone line, just the same as on a traditional phone line.
Extra steps you might need to take
Configure your settings to suit your device type
With Cloud Voice Express, three device settings are available, including Default, Fax machine and Oyster payment machine.
If you have a fax machine or Oyster payment machine, you should make sure that the relevant device setting is selected instead of the Default setting. This can help ensure the analogue phone adaptor works properly.
To select a new device setting:
- Log in to My Account – make sure to use your Admin username and password.
- When you’ve logged in, go to Manage your services.
- Next, go to Cloud Voice Express and select Launch now.
- Now, scroll down to Devices.
- You should find your connected analogue phone adaptor – select Show details for number(s).
- Expand the Ports section using the arrow on the right.
- Your number will be displayed – select Edit.
- Then using the Device Types drop-down menu, select either Default, Fax machine, or Oyster payment machine.
- Finally, select Save.
Your Cloud Voice Express analogue phone adaptor will restart automatically.
Got warehouse bells? You might need Expert Setup support
Warehouse bells are often wired directly to the PSTN wall socket – in this situation you will need to purchase an Expert Setup engineer appointment to help with this. Our engineer can also help to improve the setup of all your BT equipment.
To arrange an Expert Setup appointment, or check on an existing appointment, please contact us.
Still experiencing issues?
Everything should be working now. But if you have any problems with the analogue phone adaptor you’ve connected, such as caller ID devices, faxes, and warehouse bells, please contact the supplier of your device.