In this guide, you can find out how to get your BT Business Ultra Broadband network set up, and how to use its features and configure its settings.
Setting up your BT Business Ultra Broadband network
There’s just a few things you’ll need to do to get your BT Business Ultra Broadband network working, once your broadband line’s ready and your equipment’s been delivered.
Please note
If an engineer is installing your broadband line
You can set up your delivered equipment straight away, unless extra engineering work is needed.
If you’re installing it yourself
Your broadband line will only be activated by 23:59 on the agreed activation date. Once it’s activated, you can set up your delivered equipment.
Get set up
Find your speed tier below and follow the instructions to get your equipment set up.
You can view your speed tier in your order confirmation email from us.
Standard Fibre 76 Ultra customers
In the post, we’ll send you:
- A BT Business Smart Hub Ultra
- An MX67C Router
- An MR28 Access Point.
This is all you’ll need to get your BT Business Ultra Broadband service set up once your broadband line is ready.
Please note: if you already have an existing broadband hub, you’ll need to switch it off and unplug it before setting up your new equipment.
How to set up your new equipment
For in-depth setup instructions and illustrations of your equipment, check out our PDF guide for Ultra Standard Fibre 76. Alternatively, follow the instructions below.
Firstly, connect your BT Business Smart Hub Ultra to the phone socket
- Plug your broadband cable (the one with grey ends) into your BT Business Smart Hub Ultra.
- Plug the other end into your phone line’s master socket. Please note, it cannot be an extension socket.
- If the cable doesn't fit the socket, use the filter you received with the Smart Hub Ultra.
Then, plug in and switch on your Smart Hub Ultra
- Slide the two parts of the Smart Hub Ultra’s plug together until they click into place.
- Connect the power cable to the Smart Hub Ultra and plug it in.
- Switch on your Smart Hub Ultra, and it'll light up. After a few minutes, the light will turn white.
Next, power and connect your MX67C Router
- Connect the power adaptor from the MX67C Router box to the separate power cable and plug it in.
- Using a black ethernet cable from the MX67C Router box, connect the WAN port on the MX67C router into one of the ethernet ports on the BT Business Smart Hub Ultra.
- Once powered and connected, the MX67C Router will take 10 to 15 minutes to connect and update the firmware. It will display a solid white LED status once it’s connected and operational.
- Once the solid white LED light is displayed, add the 2 LTE antennae to the back of the MX67C router.
Now, power and connect your MR28 Access Point
- Remove the mount plate on the back of the MR28 Access Point to expose the cable access bay.
- Connect the remaining power cord to the MR28 Access Point and plug it in.
- Add the remaining ethernet cable to the MR28 Access Point, and connect it to the MX67C Router using one of the 4 LAN ports on the back.
- Once it’s ready to connect, the access point will display a green LED status.
Finally, connect to your BT Business Ultra Broadband network
- On a device you want to connect, for example a mobile, tablet or laptop, go to your Wi-Fi options. BTUltraBroadband should now show as a network you can connect to.
- The password for this network is the serial number on the bottom of your MX67C Router.
- Once you’ve entered this password, you should be connected to your new BT Business Ultra Broadband network.
Next steps: optimising your network with an Expert Setup appointment
Once your network is working, an Expert Setup engineer will come to your premises within the next few days to optimise it, as part of our service to you. They can help with things like:
- Installing up to two additional access points
- Updating your network name and password
- Setting up Guest Wi-Fi, if you want it
- Setting up Dynamic IPs.
FTTP 150 and FTTP 300 Ultra customers
In the post, we’ll send you:
- An MX67C Router
- An MR28 Access Point.
This is all you’ll need to get your BT Business Ultra Broadband service set up once your broadband line is ready.
Please note: if you already have an existing broadband hub, you’ll need to switch it off and unplug it before setting up your new equipment.
How to set up your new equipment
For in-depth setup instructions and illustrations of your equipment, check out our PDF guide for Ultra Full Fibre 150 and 300. Alternatively, follow the instructions below.
Firstly, power and connect your MX67C Router
- Connect the power adaptor from the MX67C Router box to the separate power cable and plug it in.
- Using a black ethernet cable from the MX67C Router box, connect one end into the WAN port on the MX67C Router.
- Plug the other end into the master socket. If it doesn’t fit, you can use the filter you received with the Smart Hub Ultra.
- Once powered and connected, the MX67C Router will take 10 to 15 minutes to connect and update the firmware. It will display a solid white LED status once it’s connected and operational.
- Once the solid white LED light is displayed, add the 2 LTE antennae to the back of the MX67C router.
Then, power and connect your MR28 Access Point
- Remove the mount plate on the back of the MR28 Access Point to expose the cable access bay.
- Connect the remaining power cord to the MR28 and plug it in.
- Add the remaining ethernet cable to the MR28 and connect into the MX67C using one of the 4 LAN ports on the back of the device.
- Once ready to connect, the access point will display a green LED status.
Finally, connect to your BT Business Ultra Broadband network
- On a device you want to connect, for example a mobile, tablet or laptop, go to your Wi-Fi options. BTUltraBroadband should now show as a network you can connect to.
- The password for this network is the serial number on the bottom of your MX67C Router.
- Once you’ve entered this password, you should be connected to your new BT Business Ultra Broadband network.
Next steps: optimising your network with an Expert Setup appointment
Once your network is working, an Expert Setup engineer will come to your premises within the next few days to optimise it, as part of our service to you. They can help with things like:
- Installing up to two additional access points
- Updating your network name and password
- Setting up Guest Wi-Fi, if you want it
- Setting up Dynamic IPs.
FTTP 500 and FTTP 900 customers
In the post, we’ll send you:
- An MX75 Router
- An MR36 Access Point
- An MG41 Cellular Gateway.
This is all you’ll need to get your BT Business Ultra Broadband service set up once your broadband line is ready.
Please note: if you already have an existing broadband hub, you’ll need to switch it off and unplug it before setting up your new equipment.
How to set up your new equipment
For in-depth setup instructions and illustrations of your equipment, check out our PDF guide for Ultra Full Fibre 500 and 900. Alternatively, follow the instructions below.
Firstly, power and connect your MX75 Router
- Connect the power adaptor from the MX75 Router box to the separate power cable and plug it in.
- Using a black ethernet cable from the MX75 Router box, connect one end into the WAN port on the MX75 Router.
- Plug the other end into the master socket. If it doesn’t fit, you can use the filter you received with the Smart Hub Ultra.
- Once powered and connected, the MX75 Router will take 10 to 15 minutes to connect and update the firmware. It will display a solid white LED status once it’s connected and operational.
Then, power and connect your MR36 Access Point
- Remove the mount plate on the back of the MR36 Access Point to expose the cable access bay.
- Connect the remaining power cord to the MR36 Access Point and plug it in.
- Add the remaining ethernet cable to the MR36 Access Point and connect into the MX75 Router using one of the 10 LAN ports on the back.
- Once ready to connect, the MR36 Access Point will display a green LED status.
Next, connect to your BT Business Ultra Broadband network
- On a device you want to connect, for example a mobile, tablet or laptop, go to your Wi-Fi options. BTUltraBroadband should now show as a network you can connect to.
- The password for this network is the serial number on the bottom of your MX75 Router.
- Once you’ve entered this password, you should be connected to your new BT Business Ultra Broadband network.
Finally, connect and power your MG41 Cellular Gateway
- Place the MG41 Cellular Gateway in a location that will ensure the best connection.
- Connect your MG41 Cellular Gateway to power using the remaining power cable – the power and ethernet port can be found on the back behind the screwed case. Once you've done this, turn the power on.
- Connect an ethernet cable from the MG41 Cellular Gateway to the MX75 Router’s Internet Port 2, which you can find on the back of the router.
- The MG41 Cellular Gateway will turn on, and the power LED will glow solid orange until it comes online.
- It will then change to solid white once it comes online.
Next steps: optimising your network with an Expert Setup appointment
Once your network is working, an Expert Setup engineer will come to your premises within the next few days to optimise it, as part of our service to you. They can help with things like:
- Installing up to two additional access points
- Updating your network name and password
- Setting up Guest Wi-Fi, if you want it
- Setting up Dynamic IPs.
Using BT Business Ultra Broadband
How to access the Ultra Broadband User Portal
Finding the Ultra BB User Portal
- Go to bt.com/business.
- Click Log in in the top right corner.
- Enter your username and password and click Sign in.
- You’ll now see the My account homepage.
- Scroll down until you see Manage your services.
Viewing data about your Ultra BB service
Click the Launch Ultra BB button to open your Ultra BB homepage. Here you’ll see traffic data for your connection and the devices you’ve connected to it.
Hover over the left-hand Monitor menu to access the Summary Reports section, which will give you detailed traffic and device usage analytics (you can set filters and drill into the various reports to get to the detail).
You can export the Summary Report to Excel or send it as an email using the Export to Excel dropdown option on the top-right of the page.
What does your LED status mean?
MX67C - Your WAN and Mobile Router (up to 300Mbps)
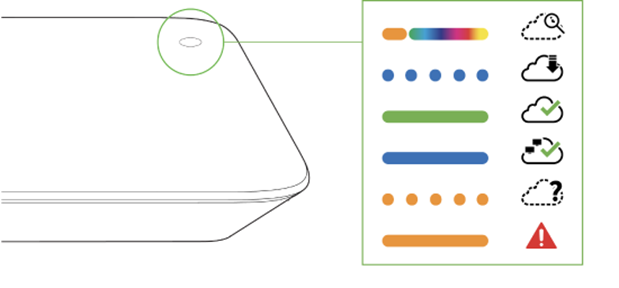
The MX67C series devices uses an LED to inform the user of the device's status. LED patterns and their meanings are described below.
|
LED status |
Meaning |
|
Solid orange |
Power is applied but the device is not connected to the Meraki Dashboard |
|
Rainbow colours |
The device is attempting to connect to Meraki Dashboard |
|
Flashing white |
Firmware upgrade in progress |
|
Solid white |
Fully operational/connected, uplink actively using wired WAN |
|
Solid purple |
Fully operational/connected, uplink actively using integrated cellular failover |
MX75 - Your WAN Router (500 and 900 Mbps)
The MX75 series devices uses an LED to inform the user of the device's status. LED patterns and their meanings are described below.
|
LED status |
Meaning |
|
Solid orange |
Power is applied but the device is not connected to the Meraki Dashboard |
|
Rainbow colours |
The device is attempting to connect to Meraki Dashboard |
|
Flashing white |
Firmware upgrade in progress |
|
Solid white |
Fully operational/connected, uplink actively using wired WAN |
|
Solid purple |
Fully operational/connected, uplink actively using integrated cellular failover |
MR28 & MR36 - Your Wi-Fi Access Point (AP)
LED indicators
Your MR28 is equipped with a multi-colour LED light on the front of the unit to convey information about system functionality and performance:
- Orange - AP is booting (permanent orange suggests hardware issue)
- Rainbow - AP is initializing/scanning
- Blinking blue - AP is upgrading
- Green - AP in Gateway mode with no clients
- Blue - AP in Gateway mode with clients
- Blinking orange - AP can't find uplink
The MR28 may be operated in “Run Dark” mode for additional security and to reduce the visibility of the access point. In this mode, the LED will not be illuminated. This mode may be enabled through Meraki dashboard.
MG41 - Your mobile backup device
|
LED status |
Meaning |
|
Solid orange |
Power is applied but the device is not connected to the Meraki Dashboard |
|
Rainbow colours |
The device is attempting to connect to Meraki Dashboard |
|
Flashing white |
Firmware upgrade in progress |
|
Solid white |
Fully operational/connected to LAN |
|
Solid purple |
Fully operational/connected to cellular network |
Changing your settings
To request configuration changes you’ll need to fill in the appropriate form:
- Customise your Ultra Broadband Security settings
- Configure your Ultra Broadband LAN settings
- Configure Ultra Broadband Wi-Fi and guest Wi-Fi settings
We’ll aim to make the changes you’ve asked for by the end of the next working day, between 8:00 and 17:00.
Please note although we’ll make any configuration changes that you ask us to, we’re not accountable for the subsequent behaviour of your network or any connected devices. So please only request changes to your settings if you have a full understanding of their impact.
Please see the Wi-Fi, LAN and Security base settings below, these will help guide you on any changes that you wish to make to your default configuration setup.
Wi-Fi options
|
Wireless option |
Available settings |
Default setting |
Notes |
|
SSID 1 |
• Enabled |
Disabled |
SSID stands for Service Set Identifier and is your network’s name. You can enable this whenever you want and choose what to call your wi-fi network. |
|
SSID 2 Guest Wi-Fi |
• Enabled |
Disabled |
Use this to choose the name of your Guest Wi-Fi. |
|
Wi-fi passwords (per SSID) |
|
|
This is where you set up your own passwords. |
|
Security encryption type |
• Open |
|
Choose the option from those available. |
|
Visibility of SSID |
• Advertise this SSID publicly |
Advertise this SSID publicly |
If you want to hide any of your active wi-fi networks. Can be set independently for each network if both are active. |
LAN options
|
LAN option |
Available settings |
Default setting |
Notes |
|
Client tracking |
• Track clients by MAC address |
Track clients by MAC address |
You may need to switch to IP address tracking if your LAN equipment requires it. |
|
Routes |
Add static routes manually. |
192.168.128.0/24 (default, data) |
You’ve got two route templates: one for data traffic, one for voice calls over the network. It’s unlikely that you’ll need any more than that, but you can change the actual internal IP addressing scheme for each if you need to. |
|
Per-port VLAN config |
Manual port configuration |
|
|
|
Client addressing |
• Run a DHCP server |
Run DHCP Server |
MX67C comes with 5 LAN ports: 4 ports configured as trunks, 1 configured as |
|
Reserved IP ranges |
Manual configuration |
|
You can add reserved IP ranges on request. |
|
Fixed IP assignments |
Manual configuration |
IP assigned on request |
You can add fixed IP ranges on request. |
|
Port forwarding |
Manual configuration |
|
Use this to forward traffic from different ports to specific devices or applications at internal IP addresses on your LAN. You can set it up so multiple servers receive traffic from the same public IP address. You can add as many forwarding rules as you need. |
|
1:1 NAT |
Manual configuration |
|
1:1 NAT (Network Address Translation) maps one internal address (usually private) to one external address (usually public). It’s for companies with multiple public IP addresses, and for networks with multiple servers behind a firewall (such as two web servers and two mail servers). |
|
1: Many NAT |
Manual configuration |
|
1: Many NAT configuration allows the Managed CPE device to forward traffic from a configured public IP to internal servers. |
Security
|
Settings |
Rules/ Description |
Ultra BB Default Settings |
Layer 3 Firewall
Outbound Rules
Security Device Settings |
You can create custom rules for outbound traffic, which we’ll add manually. You’ll need to tell us the protocol, source, source port, destination, destination port and whether you want to allow/deny the access. ICMP ping is enabled for any remote IP addresses by default. But you can change this and specify IP addresses if you prefer. |
No default settings, custom setup on request.
Any |
Layer 7 Firewall and Application Control
Firewall Rules |
This allows you to block pre-defined categories of applications. You can then block everything for that category or be more specific by domain name, IP, port, host name or country. Available categories are:
|
We’ve blocked these categories
|
Advanced Malware ProtectionMode
Whitelisted URLs
Whitelisted Files |
AMP helps protect you against known malware by classifying a file as ‘clean’, ‘malicious’ or ‘unknown’. In case you need to whitelist certain URLs from being scanned by the AMP system. In case you need to whitelist certain files from being scanned by the AMP system. |
Add manually on request. Add manually on request. |
Frequently asked questions
- Is expert set up mandatory and do I need to pay for it?
One of our expert setup engineers will visit your premise following your broadband installation, they will optimise your network including offering up to 2 additional access points. They can also help set up static IPs and Guest Wi-Fi configurations. This engineer visit is included in your package, you are able to set up the devices prior to the expert setup.
- Do I need to buy extra W-Fi Access Points?
No, the cost for additional access points is included with your package. Engineers will visit your premise and if required are able to offer up to 2 additional access points on top of the access point included in your initial bundle.
- How long does it take for new broadband connection to become active?
- A new connection can become active within 0 - 40 business days.
- A new connection can become active within 0 - 40 business days.
- Do I have to pay for the broadband router?
- No, it’ll be provided free of cost regardless of any Ultra Broadband plan you choose.
- No, it’ll be provided free of cost regardless of any Ultra Broadband plan you choose.
- Will I get the maximum broadband speed promised in the plan?
- Yes, but the speed of internet shall vary as per your location. It will be confirmed by our sales agent.
- Yes, but the speed of internet shall vary as per your location. It will be confirmed by our sales agent.
- Will I receive landline/telephone/handset/receiver with the broadband router?
- No, BT will provide high end Cisco Meraki routers and other necessary devices.
- No, BT will provide high end Cisco Meraki routers and other necessary devices.
- Does broadband Internet need a phone line?
- No phone line required.
- No phone line required.
- How to change my existing BT broadband plan?
- You can contact the sales team; they’ll be able to provide the best option suitable as per your needs.
- You can contact the sales team; they’ll be able to provide the best option suitable as per your needs.
- Is there a separate helpdesk for a Premium customer?
- No, all BT Ultra Broadband customers will use the same help desk team.
- No, all BT Ultra Broadband customers will use the same help desk team.
- Is there any early termination charges involved? If yes, then how much?
- Yes, ET charges are applicable in case of customer wishes to withdraw the connection within the contract term.
- Yes, ET charges are applicable in case of customer wishes to withdraw the connection within the contract term.
- Will I receive a replacement for a faulty device?
- Yes, once a fault has been diagnosed by our BT service team, we will send out a replacement device that will be installed by an engineer.