Setting up your Yealink T87W Wi-Fi desk phone on Digital Voice for Business
To connect your Yealink T87W Wi-Fi desk phone to your Digital Voice for Business service, you'll need to do a few things.
What’s in the box?
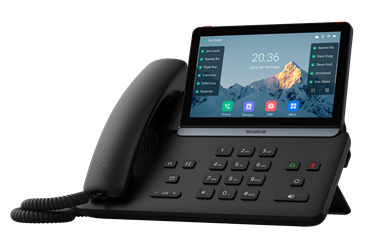
- Yealink T87W phone and handset (pictured)
- Handset cord (pictured)
- Phone stand (pictured)
- Ethernet cable
- Quick start guide
- Power adapter (optional)
- Wall mount bracket (optional)
How to set up your phone
To get your phone set up, you’ll need to:
- Find the right place for your phone
- Connect your handset and any accessories
- Connect your phone to power and the network
Find the right place for your phone
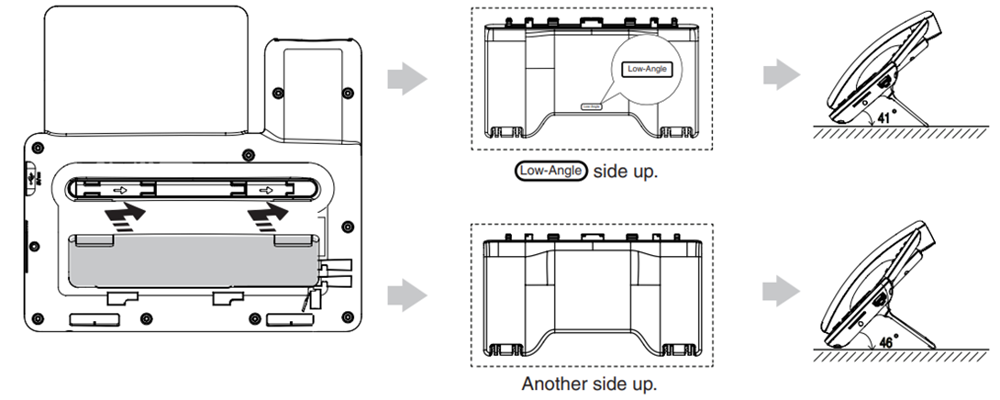
Turn your phone upside down so you can see the ports. Slot the phone stand into the slots on the back of the phone. Use the side marked Low-Angle if you want the phone to sit at 41 degrees, or the other side for a slightly more upright 46 degrees.
You can also mount the phone on a wall using the optional wall mount bracket.
Connect your handset and any accessories
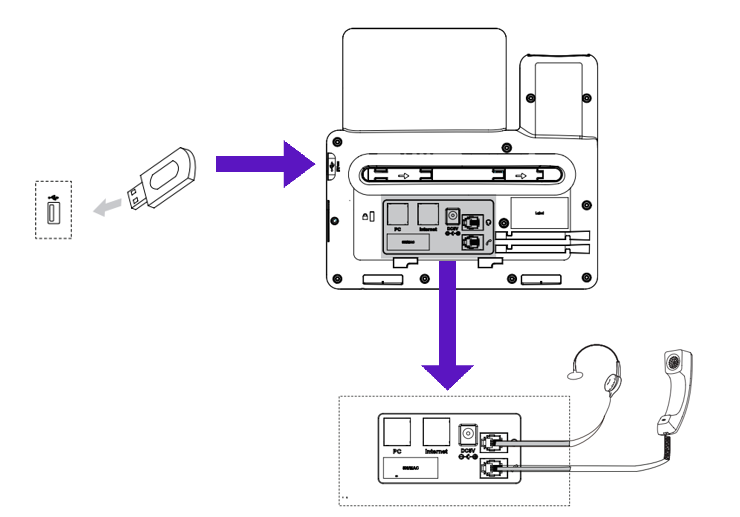
- Connect one end of the handset cord to the handset, and the other end to the handset port on the back of the phone.
- If you’re using a wired headset, connect it to the headset port.
- If you want to use a USB device, such as a USB headset, plug it into the USB port on the side of the phone.
Connect your phone to power and the network
To get your phone working, you’ll either need to connect it to:
- Mains power
- Or Power over Ethernet (PoE)
Option A: Connect your phone to mains power
Connect the power adapter to the DC5V port on the phone, then plug it into the mains.
Then connect your phone to the network using either the Ethernet cable or Wi-Fi.
Using the Ethernet cable
Connect the Ethernet cable between the Internet port on the phone and the one on the wall, or on your broadband hub or network switch.
Using Wi-Fi
If you’re using Wi-Fi, you don’t need the Ethernet cable. First, turn on Wi-Fi:
- Select Settings > Network > Wi-Fi.
- Switch Wi-Fi to On.
- Confirm the setting if you’re asked to.
Then connect to your Wi-Fi network in one of two ways.
Entering your Wi-Fi password:
- Select Settings > Network > Wi-Fi.
- Check Wi-Fi is switched On.
- Select your Wi-Fi network.
- Enter your Wi-Fi password using the on-screen keyboard.
- Select Connect.
Use Wi-Fi Protected Setup (WPS):
- Select Settings > Network > Wi-Fi.
- Select WPS (if available).
- Press and hold the WPS button on your router or hub.
Once your phone’s connected, it’ll connect to Digital Voice for Business and download your phone details automatically. This may take a couple of minutes.
Option B: Connect your phone using Power over Ethernet (PoE)
If you have a network switch or hub that supports PoE (IEEE 802.3af), you can power your phone with the Ethernet cable and you won’t need the power adapter.
- Connect the Ethernet cable between the Internet port on the phone and a free port on your PoE switch or hub.
- Make sure your switch or hub is IEEE 802.3af compliant.
- You can also share the network connection with another device, such as a computer, using the PC port on the phone. This is optional.
Important: don’t unplug your phone or turn off its power while it’s updating its software.
Connected via Wi-Fi? Get more help
My wireless network doesn’t show up when scanning – what should I do?
Your network name (SSID) may be hidden. You can add the network yourself:
- Select Settings > Network > Wi-Fi.
- Check Wi-Fi is switched On.
- Select Add network.
- Enter the name of your wireless network (SSID).
- Select the security type, for example WPA/WPA2-PSK.
- Enter your Wi-Fi password.
- Select Connect.
How can I find out if I’m connected, and the Wi-Fi signal strength?
Select Settings > Network > Wi-Fi.
What Wi-Fi signal strength do I need?
The stronger your Wi-Fi signal, the better your call quality. Signal strength 3 and 4 show the Wi-Fi network is reliable and should support a quality voice service.
- Signal strength 4: excellent
- Signal strength 3: good
- Signal strength 2: weak
- Signal strength 1: poor
If you keep having problems with call quality, try connecting your phone to your router or hub with the Ethernet cable. This will show whether the problem is your Wi-Fi.
Will my phone remember the Wi-Fi details?
Yes. Once you’ve connected, your phone saves the network details and reconnects automatically.
To remove a saved network, select Settings > Network > Wi-Fi, then select the network and choose Forget.
I want to stop connecting to Wi-Fi and use the Ethernet cable instead – how can I do this?
- Select Settings > Network > Wi-Fi.
- Switch Wi-Fi to Off.
- Connect the Ethernet cable between the phone and your router or switch.
My broadband is connected and my Wi-Fi seems okay, but I’m still having issues. What can I do?
Turn Wi-Fi off and back on again:
- Select Settings > Network > Wi-Fi.
- Switch Wi-Fi to Off.
- Wait a few seconds, then switch Wi-Fi back On.
Your phone will reconnect to your wireless network automatically.
Common causes of Wi-Fi interference
- Everyday appliances such as microwaves, fluorescent lights, power cables and adapters give off signals that can interfere with your Wi-Fi.
- Wireless devices such as wireless headsets, keyboards, mice, activity trackers and security cameras can slow things down in the same way.
- Building materials such as concrete, metal and stone can weaken Wi-Fi signals. Reflective surfaces, like mirrors and the foil in some insulation, can make them unreliable.
- Neighbouring Wi-Fi networks can interfere with yours, especially in busy areas with lots of networks close together.
Tips on reducing Wi-Fi interference
- Move your router away from other routers, appliances, wireless devices and thick walls.
- Unplug appliances and devices when you’re not using them.
- Avoid using lots of wireless devices close together at the same time.
- Try a different wireless frequency (5GHz or 2.4GHz) or channel.
- Think about upgrading your router, or adding Wi-Fi extenders or a mesh system so you get a strong, reliable signal where your phone is.
Using headsets and accessories
You can use your Yealink T87W with a range of accessories.
Headsets
Your phone works with:
- RJ9 headsets – connect to the headset port on the phone.
- USB headsets – connect to the USB port on the phone.
- Bluetooth headsets – pair with the phone’s built-in Bluetooth.
- Wireless headsets – connect a supported Yealink EHS adapter, such as the EHS40, to the headset port, then pair your headset with the adapter.
For help pairing and using your headset, check the headset manufacturer’s user guide.
Bluetooth
Your phone has built-in Bluetooth, so you can connect a compatible Bluetooth headset directly. Pair it using the phone’s Settings menu. Once paired, you can make and take calls just like with a wired headset.
Expansion module
Your phone works with the Yealink EXP55 expansion module, which gives you extra keys for speed dials, contacts and other features.
- Connect the expansion module to the phone using the USB cable that comes with it.
- If you need to, connect a Yealink power adapter to the expansion module.
Once it’s connected, you can set up the keys for speed dials, contacts and other features.
Check you’re set up
Once your phone’s connected to the network, it’ll update its software. This may take a little while.
When it’s finished, you’ll see your line number on one of the line keys, with a green phone icon next to it.  This means you’re set up.
If you see a warning symbol, or no line number, something has gone wrong.  Contact our Faults team and we’ll help.
All set up? It’s time to log in to the portal
Now your phone is working and connected to the network, you can log in to the Digital Voice for Business portal to manage all your phone’s features and settings.
Want to learn more?
More about your Yealink T87W Wi-Fi desk phone
Our Yealink T87W Wi-Fi desk phone guide (PDF, 1.1MB) explains how to set up and use your phone, including making calls, using your call history and switching to speakerphone.
More about Digital Voice for Business
Find out more in our guide to Digital Voice for Business.