Using voicemail on BT Cloud Voice
With BT Cloud Voice, it's easy for you to set up, change and manage your voicemail, whether you’re an administrator or a user of the service.
To use voicemail on Cloud Voice, you’ll need either the Connect or Collaborate feature package.
Cloud Voice users: how to set up voicemail
If you’re a user of Cloud Voice, you can divert all calls to voicemail, send calls to voicemail when you're on the phone, or set all calls to divert to voicemail when you're out or unavailable.
If you can't take the call, callers will hear a standard greeting message, or your personal recorded greeting.
Watch our YouTube video to learn how to set up voicemail in the BT Cloud Voice Business Portal. Or for more setup information, follow the steps below.
How to manage voicemail for BT Cloud Voice
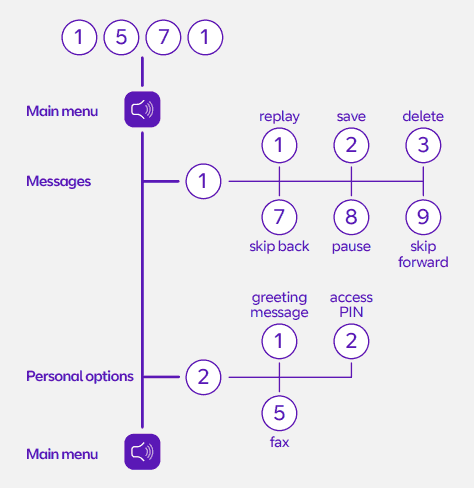
The easiest way to set up and configure your voicemail settings is by dialling 1571 and following the prompts.
Here’s an overview of the menu options:
Alternatively, you can login to the BT Cloud Voice Business Portal.
Setting up voicemail using the BT Cloud Voice Business Portal
- Sign in to the BT Cloud Voice Business Portal.
- From the Dashboard, select Users.
- From the Users list, select the person you'd like to activate Voicemail for.
- Select Features from the left-hand sidebar menu.
- Select Voicemail.
- Enter the requested information.
- For help, tap the Assist me button to open a help article in a new tab.
What else can I do with voicemail?
In the voicemail feature on the BT Cloud Voice Business Portal you can:
- Choose how and when to direct your calls to voicemail.
- Choose your greeting message (system or personal).
- Configure an email address or addresses to send the recording to.
- Set up Auto delete, so if your mailbox is full and you get a new message the oldest message is auto deleted.
Storing messages
Messages are stored as MP3 files which can be emailed whenever you get a new voice message. You can listen to these, save them or forward them.
Your mailbox can store up to 120 messages and saved messages are automatically deleted after 30 days. Any new messages which haven't been listened to get automatically deleted after six months.
Retrieving messages
When you've got a new message, you'll see a message waiting indicator on your device, or you’ll receive an email notification if you’ve set it up in the Cloud Voice Business portal.
Dial 1571 and follow the prompts to retrieve voicemail messages using your device or click on the file in the email notification. You can also retrieve it via the Cloud Voice Business Portal.
You can also use your PIN to remotely access your messages remotely. Just dial the number voicemail is installed on and when it answers, press * followed by your PIN. This will transfer you to retrieve your message.
Email voicemails only
Enabling Email voicemails only, means that your messages will only be stored as emails. You can choose to send all your messages to a specified email address.
It’s a handy feature if you get loads of messages and your mailbox fills up too quickly, or if you're out of the office most of the time.
You can do this on the BT Cloud Voice Business Portal by checking the Email voicemails only box, entering the email address you’d like your messages to be sent to, and clicking save.
Please note: If you do this, your voicemail messages will no longer appear on your phone, and you won’t be able to use your phone to check them using 1571. Your messages will only be stored as emails.
Administrators of Cloud Voice: how to set up voicemail features
If you’re an administrator and want to set up voicemail for Hunt Groups or Auto Attendant, first you’ll need to make sure that voicemail is set up for users. You can find out how to do this in our Cloud Voice users section above.
Once you’ve done this, you can follow the instructions on setting up voicemail for Hunt Groups and Auto Attendant.
How to set up voicemail for Hunt Groups
- Sign in to the BT Cloud Voice Business Portal
- From the dashboard, search the number you want to divert in the Call routing groups (Enhanced) search field and tap the Hunt Group name.
- Under the call settings menu, select Manage.
- Tick the Forward calls when there is no answer box. If it was already ticked or not yet ticked, make a note of this – you may need to revert the changes back later.
- Select how long you want the call to ring before the call is diverted. 5 seconds is the shortest time you can select – this will divert the call straight to the destination.
- In the number field, enter *55 followed by the extension number you want to retrieve the voicemail on. For example, to divert calls to extension 001 you would enter *55001.
- Tap Save.
- This will now forward calls to that user's voicemail.
How to set up voicemail for Auto Attendant
- Sign in to the BT Cloud Voice Business Portal
- From the dashboard, search the number you want to divert in the Call routing groups (Enhanced) search field and tap the Auto Attendant name.
- Select the Business hours tab, or After hours if you want to make this change for after your business working hours.
- Under the dialing menu, select Manage menu. Take a note of what this is set as, as you may need to revert the changes back later.
- Next to the option you wish to set to go to voicemail, change the number field to *55 then follow with the extension number you want to retrieve the voicemail on. For example, to divert calls to extension 001 you would enter *55001.
- Tap Submit.
- This will now forward calls to that user's voicemail.
Full voicemail user guide for Cloud Voice
For more help with voicemail, download our user guide: