Very rarely your desk phone might not connect to BT systems. If this happens, you'll need to do a factory reset. Here’s what you need to do.
- Use the phone menu to start the factory reset.
- Connect your phone to the internet with wi-fi, using either:
- a manual password
- WPS
- Use the device keypad to enter the Provisioning URL.
Step 1 - Start the factory reset using the phone menu
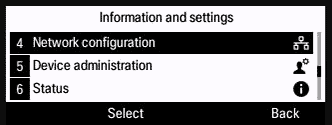
You’ll need to press the settings button on your phone to bring up the menu.
- Select Device administration.
- Now select Factory reset.
You’ll see a message asking if you want to perform a factory reset – click OK. - After the factory reset, you'll be returned to the home screen which will display Network Connection Failure.
Now go to Step 2 to re-connect the phone to the internet using Wi-Fi.
Step 2 - Connect your phone to Wi-Fi
a. Using a manual password
Press the settings button on your phone to bring up the menu.
- Select Device administration.
- Select Wi-Fi configuration.
- Select Wi-Fi profile.
- Select Scan – you'll see a message saying wireless scan in progress.
When it’s complete choose your Business Hub from the options displayed. - Select Passphrase and enter your wireless password using the keypad.
Your phone is now connected to the Wi-Fi. Now go to Step 3 - Enter the Provisioning URL
b. Using WPS
Press the settings button on your phone to bring up the menu.
- Select Device administration.
- Select Wi-Fi configuration.
- Select Wi-Fi type.
- Change Wi-Fi type to WPS and then choose Set.
- Select Push button configuration. You’ll be asked to press your Hub’s WPS button. Press continue when you’ve done this.
Your Hub and Phone will connect using WPS. Your screen will display Successfully connected before returning to the home screen.
If the Set Password screen appears, select Skip. Now go to Step 3 – Enter the Provisioning URL.
Step 3 - Enter the Provisioning URL into the device
Press the settings button on your phone to bring up the menu.
- Select Device administration.
- Select Profile rule.
- Using the keypad, enter https://dm-ipcomms.bt.com/dms/Cisco_IP_Phone_6861/CiscoDev-3PCC_Bootstrap.xml
Note that characters (:/_) are behind the 1 of the keypad. - You’ll see confirmation that you’ve been successful, and configuration follows. Your phone screen will then return to the home screen and the line button will turn green.
If nothing happens after pressing resync, please make sure you’ve entered the URL correctly. If it is correct, you'll have to restart your phone and enter the URL again.
Restart the phone
You can restart your phone if you need to reset it. To start with press the settings button on your phone to bring up the menu.
- Select Device Administration.
- Select Restart.
- You’ll be asked if you want to reboot the system – click OK.
A Cisco logo will appear on screen while your phone is rebooting. - After rebooting you'll be returned to the home screen. If you’re connected, the line button to the left of the screen will be green. If it’s amber you’re not connected.