The BT Business Hub 5 has Smart Wireless, which finds the strongest available signal and dual-band technology, which gives you good wi-fi performance.
You'll find the wireless network name (SSID) and wireless key on the settings card on the back of the hub.
Connecting the BT Business Hub 5
If you've got an appointment for an engineer to come out and install your fibre, you don't need to install the Hub 5 yourself. The engineer will do it for you. We'll send the hub to you a day or so before your engineer appointment. Or to connect your hub yourself:
Connecting to the line socket
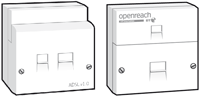
If you've got a double socket like one of these:
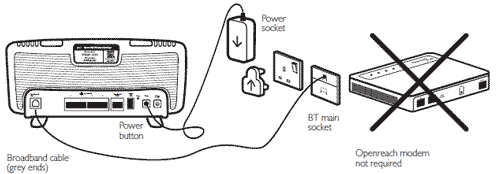
1. Connect the broadband cable (grey plug at each end) straight into the BT main socket.
2. Plug the other end into the Broadband DSL socket on the back of the hub.
Alternatively, if you've got a standard single socket, you'll need to use one of the ADSL filters that you'll find in the Business Hub 5 box.
1. Connect one end of the broadband cable (grey plug at each end) to a filter.
2. Connect the filter to the BT main phone socket.
3. Connect the other end of the cable to the port or socket on the hub labelled DSL.
4. Plug your phone into the other socket on the filter.
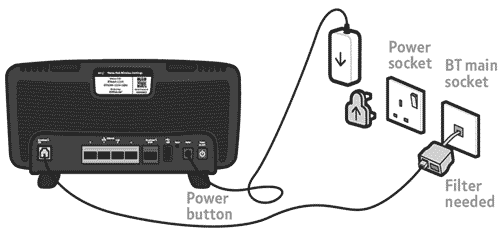
5. Plug your Hub 5 into the power socket and turn it on (the on/off button is on the back of the hub).
6. If you want, you can connect a computer directly to the yellow sockets on the back of the Hub 5 using the Ethernet cable that came with it (it’s the one with yellow ends).
Smart Setup
Smart Setup is BT's online set-up wizard. It guides you through setting up all your BT Broadband features and services on the first device that you connect to your BT Business Hub 5.
When you connect your first device, Smart Setup will show you the BT features and services that are available for that device. It should appear as soon as you connect to the Hub and then open a web browser.
Accessing the Hub Manager
The BT Business Hub manager allows you to change settings. You can access it by following the steps below:
- Open your web browser and type http://btbusinesshub.home in the address bar. Make sure you're not using a VPN connection as this can stop you accessing the Hub Manager page.
- Press Enter or your return key.
- When you submit or save any changes in your Hub Manager, you may be asked to enter your password - if you haven't changed it, you'll find your Hub Admin password on the bottom of your Hub.
You can change your Admin password by:
- Click Settings.
- Enter your current password.
- Click on Admin Password.
- Enter your current Admin password. (If you haven't previously changed it you'll find the default password on the label on the back of the Hub).
- Enter your new Admin password twice.
- You can also enter a password hint. If you forget your password when you to enter it later you can request the Hub Manager to display your password hint which should help you remember the password.
- Click Change password.
Quick start user guide and what the lights mean
The quick start guide helps you set up, wire in an extra computer and tells you what the coloured lights on the hub mean.
BT Business Hub 5 quick start guide (PDF, 277KB)
Checking which wireless band your devices are on
You can check which devices are connected to your BT Business Hub 5 by looking at the Home network map in the Hub Manager. This shows all currently connected devices including those connected to the 2.4GHz and 5GHz wireless bands.
- Open the web browser and go to http://btbusinesshub.home. This will open the Hub Manager.
- Click on a tab and enter your Hub Manager password to log in. Unless you've changed it, you'll find it on the Hub settings card on the back of the Hub. if you've forgotten it, you can use the password override feature.
- Go to Advanced settings and click on the Business Network menu.
- Click on the Devices menu to display the Business Network connection map.
- If you have a dual band device, it is capable of connecting to both 2.4 and 5GHz. the software on the device decides which band it connects to depending mainly on how far away it is from the hub and signal strength.
Entering your broadband network username and password
Your BT Business Hub 5 should automatically pick up your broadband network username and password. But if you need to enter the details manually you can do so by simply following the steps below:
- If using a corporate VPN, disconnect.
- Open your web browser and browse to http://btbusinesshub.home to open the Hub Manager.
- To change the default username i.e. green-light@service.btclick.com, click Configure next to Broadband username.
- If asked, enter your admin password.
- Click Disconnect.
- Enter your broadband username and password in the boxes provided.
- Click Connect.
Once connected the page will show the updated details. You are now ready to browse the Internet.
If you can't remember your network username and password see What are my login details?
Security advice
To help stop unauthorised users accessing your wireless network, your BT Business Hub 5 uses WPA (Wi-Fi protected Access) wireless security, which replaces the older WEP (Wired Equivalent Protocol) security.
Some older wireless equipment can't use the more secure WPA (they don't 'support' the technology). We suggest you check with the manufacturer of your devices to check if they support WPA, and if they don't, find out if you can get a software update. If no updates are available, you might want to consider getting a more modern device which supports WPA so your network is more secure. Otherwise, you might have to follow our instructions to switch your wireless security to WEP.
Please make sure you keep your hub switched on at all times, including overnight, so that we can send the latest security updates to it as they become available. The BT Business Hub 5 has a Power Save feature that reduces energy consumption when it's not being used. What is BT Power Save?
Changing wireless channel and WPA settings
Before manually changing channels try a Wireless Channel refresh. This will ensure that your Hub 5 chooses the best channel available and Smart Wireless will continue to automatically monitor the channels to maintain a good connection.
If you decide to continue with the manual section the Smart Wireless feature will be turned off.
To manually change your wireless channel:
- Open your web browser and browse to http://btbusinesshub.home to open the Hub Manager.
- If this is the first time you have visited the Hub Manager you will be asked to change the password.
- Click on Advanced Settings and enter your password if required.
- Click on the Wireless tab.
- To manually select the wireless channel for the "2.4 GHz" band:
- Go to the 2.4 GHz page and select a channel from the drop down menu next to "Wireless Channel". First try channels 1,6 or 11.
- Click Apply to confirm the change. Then wait 60 seconds for your computer to automatically discover the new settings. There's no need to change any settings on your computer.
- You can do the same on the 5GHz page to change your 5GHz wireless channel. We recommend selecting channel 36, 40 ,44 or 48.
WEP/WPA2 settings
Your BT Business Hub 5 automatically has WPA2 only (Wi-fi Protected Access) wireless security enabled, which replaces the older WEP (Wired Equivalent Protocol) security.
If you still need to change your wireless settings simply:
- Open your web browser and browse to http://btbusinesshub.home to open the Hub Manager.
- Click on the Advanced Settings tab.
- You will be asked to enter your admin password.
- Click on Wireless.
- Change your Security setting.
For example, to change to WEP from the more secure WPA: - Click WEP (64/40 bits). Set a wireless key for the network. The key will need to be 10 characters long and use a combination of the letters a-f/A-F and numbers 0-9. You should enter a strong key - something that's easy for you to remember but hard for others to guess - and keep a note of it somewhere safe. You'll need this key to reconnect your wireless device to the Hub once the changes are complete.
- Click Apply.
- Click Yes. Any devices connected wirelessly to your BT Business Hub 5 will be disconnected (including the computer you're using if it's connected wirelessly). To reconnect these devices, simply change the set-up using the new wireless key you've chosen.
If you should want to disable WPS on the Business Hub 5
- Open the web browser on a computer or device to your Hub and go to http://btbusinesshub.home to open the Hub Manager.
- Enter the admin password. Unless you've previously changed it, you'll find the default password on your Hub settings card on the back of your Hub. if you have changed it and now forgotten it, you can use the password override feature to set up a new password.
- Once you've logged in click the Advanced Settings tab.
- Confirm by clicking the Continue to Advance Settings button.
- Click on the Wireless tab, then select the WPS option.
- Change the Wireless push button connection (WPS) enable option to Off by selecting the radio button. Click Apply.
- To turn WPS back on, repeat the steps, but select the On option.
Setting up port forwarding
If you want to enable remote access to devices connected to your wi-fi network, you can open all ports, or selected ports on the BT Business Hub 5.
If you want to set up basic Port Forwarding:
- From your web browser, open the Hub Manager at http://btbusinesshub.home
- Select Settings.
- When prompted, enter the admin password and select OK.
- Click Port Forwarding.
- From the Game or Application drop down list, select the rule you require.
- From the Device drop down list, select the device you want to access remotely.
- Click Add
If the application you want to use doesn't appear in the list, you'll need to set up Advanced Port Forwarding.
- From your web browser, open the Hub Manager at http://btbusinesshub.home
- Select Settings.
- When prompted, enter the admin password and click OK.
- Select Advanced Settings.
- Now select Firewall.
- Next, go to the Manage Games and Applications drop down and choose Add a New Game or Application.
- Enter Application name (this will describe the port you’re adding, and will also be used to name the port in the Game or Application drop down).
- Enter the Required Ports in the fields provided, click Add for the port required.
- Click Apply once all ports have been added.
- Click Back to Port Forwarding.
- Select the newly created application from the Game or Application drop down list.
- Select the device from the Device drop down list or select User-defined IP Address.
BT Business Hub 5 technical specifications
|
General |
|
| Fibre Support | Yes (via Ethernet WAN) |
| Modem Type | ADSL2 & VDSL2 |
| Access Methods supported | ADSL, VDSL (FTTC), Ethernet WAN (FTTC/FTTP) |
| 802.11b support | Yes |
| 802.11g support | Yes |
| 802.11n support | Yes |
| 802.11ac support | Yes |
| Stated speed | 4 x 10/100/1000Mbit/s Ethernet sockets (RJ45) |
| 1 x RJ45 10//100/1000Mbit/s Ethernet Socket WAN (RJ45) | |
| Security |
|
| 64/40-bit WEP | Yes (b/g mode) |
| WPA | Yes |
| WPA2 | Yes |
| Firewall | Yes |
| MAC address filtering | Yes |
| DMZ | Yes |
| WPS | Yes |
| Physical |
|
|
Size |
236x116x31mm |
| Antennas | 2.4GHz WiFi: 2x2 MIMO & 5GHz: WiFi 3x3 MIMO |
| Internal/external antennas | Internal |
| Number of WAN ports | 1 |
| Gigabit Ethernet ports | 4 |
| Ethernet connection speed | 10/100/1000Mbit/s |
| Other ports | USB, DSL |
| Other Features |
|
| 2x Wireless SSIDs (2.4GHz & 5GHz) | Yes |
| Integrated VDSL Modem | Yes |
| ADSL/VDSL Bridge Mode | Yes |
| Dynamic DNS | Yes |
| Single Static IP | Yes |
| Multiple Static IP | Yes |
| Port Forwarding | Yes |
| USB device support | Yes |
| QoS | Yes |
| Fault indication lights | Yes |
| NAT/NoNAT Support | Yes |
| Multi NAT | Yes |
| Automatic Authentication | Yes |
| Smart Setup | Yes |
| Smart Wireless | Yes |
| Dual-Band Wireless | Yes |
| Power Save | Yes |
| Smart Diagnostics | Yes |
| WPS | Yes |
| BT Wi-fi (Openzone) | Yes |
| Hub status information available via the UI | Yes |
| Remote upgrade | Yes |
| IPv6 capability | Yes |
| uPnP Support | Yes |
| DHCP Server | Yes |
| Mapped network to show devices connected to Hub | Yes |
| SIP-ALG Support | Yes |
| VPN Passthrough Support | Yes |
| Power Consumption |
|
| In Operation | 9.2W |
| Idle | 6.3W |
| Standby Mode | 0.2W |
Declaration of conformity
Declaration of conformity for the BT Business Hub 5 (PDF, 25KB)
Doesn't look like your hub or router? Check the guides to our other BT Business Hubs.