
How to connect a Digital Voice for Business phone
It’s quick and easy to connect your phone with your Digital Voice for Business service.
First, Digital Voice for Business users will need an IP phone to be able to make calls. This could be a physical IP phone that sits on a desk, or a softphone which is loaded onto a mobile, tablet, or computer.
A Digital Voice for Business administrator will need to allocate an IP phone to a user, using a secure activation process to link the user account to the device.
Once an administrator has allocated an IP phone to the user, you can follow the step-by-step instructions that apply to you below:
How to connect your Yealink W73 cordless phone to your Digital Voice for Business service
- Insert the battery into your phone.
- Snap on the back plate.
- Your phone will be pre-registered to your base station and will connect automatically.
- A steady green light on your base station tells you when this is done.
- Push the line key to view your phone's telephone number.
- Plug your handset cradle into the mains and turn it on.
- You should now be able to make and receive calls.
To find out how to use your Yealink W73 cordless phone with Digital Voice for Business, check out our handy PDF guide:
How to register your Yealink W73 cordless phone to a base station (if it hasn’t already been registered)
If your phone hasn't already been registered to a base station, follow the steps below to complete the registration process. The phone must be in registration mode before you begin.
Step 1: prepare the base station for registration
Press and hold the Paging button on the W73 base station until the LED light starts flashing. This indicates the base is in registration mode.
If the light does not flash, either:
- The button wasn’t held long enough, or
- The base already has eight phones registered to it – the maximum amount supported.
Note: if your phone is already registered to another base station, you’ll need to de-register it before continuing.
Step 2: register the phone
On the phone, press the Reg soft key. The screen will show ‘Searching’ as it looks for the base station.
Once the base station is found, the display will show ‘Easy Pairing’.
A few seconds later, it will show ‘Subscribed’.
This will be followed by ‘Initializing Data’.
If required, the phone may automatically perform a firmware update which can take up to 15 minutes.
Step 3: confirmation
Once registration is complete, the phone will display its handset number (for example, it might be the second handset registered to this particular base station). This will confirm that it has successfully paired with the base station.
To find out how to use your Yealink W73 cordless phone with Digital Voice for Business, check out our handy PDF guide:
How to connect your desktop Yealink T34W or T54W phone to your Digital Voice for Business service
1. Unpack your phone and turn it upside down so you can see it’s back.
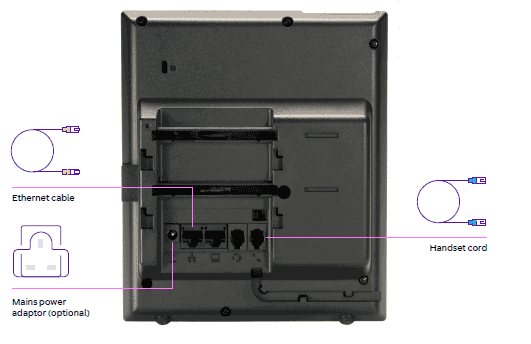
2. First, slot the phone stand into one of the three slots, depending on the angle you want.
3. Then, connect the handset cord to the port with a symbol of a phone, and the phone itself.
4. Next, plug the power cable into back of the phone.
5. Now plug one end of the Ethernet cable into the phone, and the other into the hub.
6. Your Digital Voice for Business IP Phone should boot up and start installing the firmware – do not disconnect your phone while it's doing this.
Once this is finished, your Digital Voice for Business IP Phone will be ready to use.
To find out how to use your Yealink T34W or T54W phone with Digital Voice for Business, check out our handy PDF guides:
Other phone guides
If your device model isn’t listed above and you need help getting set up, check out our full list of PDF guides for a range of IP phones.