For the steps to set up your email, select the software or device you’re using.
Email software
Outlook 2016 & 2019
Setting up Outlook to use with Office 365
Here’s what you need to do to set up Microsoft Outlook to access your Office 365 email.
There are minimum system requirements for Microsoft Office 365 to operate effectively. You can check Microsoft’s software requirements for Office 365 for business.
First, you’ll need to run Office 365 desktop setup:
You can skip this step if you've got the latest version of Office 365 installed.
- Download Microsoft Desktop Setup.
- When you see a security warning, select Run.
- In the Microsoft Desktop setup box, log in with your username and password.
- When you see Configure desktop applications and install updates, select Microsoft Outlook and then Continue.
- Accept the new terms and conditions to install Microsoft Desktop.
- When the confirmation box appears, select Finish.
Now connect your desktop version of Outlook to Office 365.
See how to automatically set up an Office 365 Exchange email account.
Outlook 2019 Mac
Setting up an Office 365 email account in Outlook 2019 Mac
Follow these steps to set up an Office 365 Premium account in Microsoft Outlook on Mac OSX.
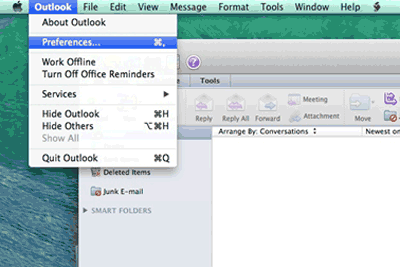
1. Open Outlook. From the Outlook menu select Preference.

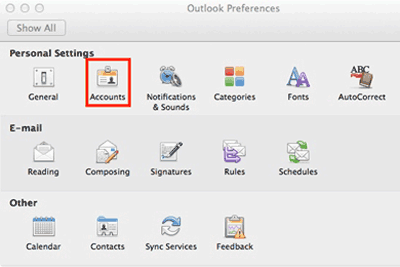
2. In the Preferences window select Accounts.

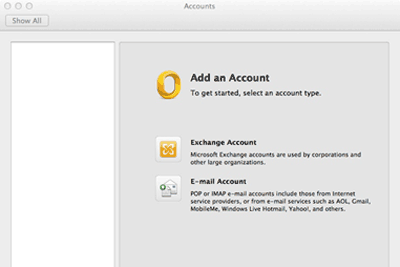
3. Now select Exchange Account.

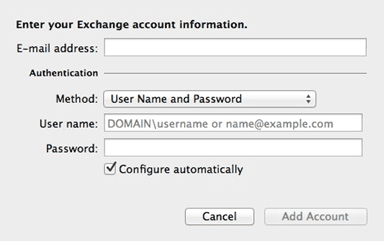
4. Enter your Office 365 Premium email address. Your username is your full email address.

5. Click on Add Account
6. You may then be prompted to allow Outlook to check with a server. If this happens select Allow.
7. Close the configuration window. Your account is now ready to use.
Mobiles
Android phones
Setting up Exchange ActiveSync on an Android mobile phone
1. From the Applications menu, tap Email. This application might be named Mail on some versions of Android.
2. Tap account, then New account.
3. Tap Exchange account. This option may be named Exchange ActiveSync on some versions of Android.
4. Enter the following account information and select Next:
- Domain\Username: enter your full email address in this box. If Domain and Username are separate text boxes in your version of Android, leave the Domain box empty and enter your full email address in the Username box.
- On some versions of Android, you need to use the domain\username format. For example, if your e-mail address is user@mycompany.com enter mycompany.com\user@mycompany.com. Your username is your full email address.
- Password: use the password that you use to access your account.
- Exchange Server: use outlook.office365.com if you have your email with us.
5. As soon as your phone verifies the server settings, the Account Options screen displays. The options available depend on the version of Android on your device. The options may include the following:
- Email checking frequency: the default value is 'Automatic' (push). When you select this option, email messages will be sent to your phone as they arrive. We recommend only selecting this option if you have an unlimited data plan.
- Amount to synchronize: this is the amount of mail you want to keep on your mobile phone. You can choose from several options, including one day, three days, and one week.
- Notify me when email arrives: if you select this option, your mobile phone will notify you when you receive a new email message.
- Sync contacts from this account: if you select this option, your contacts will be synchronized between your phone and your account.
6. Tap Next and then type a name for this account and the name you want displayed when you send email to others. Select Done to complete the email setup and to start using your account.
You might need to wait up to fifteen minutes after you set up your account before you can send or receive email.
iPhone/iPad
Setting up an iPhone or iPad with Office 365
If you've got our premium email service Office 365 you can set it up to sync all your mail, contacts and calendars. To do this:
1. Tap Settings then Mail, Contacts, Calendars.
2. Tap Add Account.
3. Tap Microsoft Exchange.
4. Fill in your information:
- In the Email field and the Username field enter your full email Office 365 email address i.e. me@mycompany.com
- In the Password field type your Office 365 password.
- The Description field is only used for you to identify the account on your device so you can type whatever you like, just make sure that it makes sense to you later.
5. Once you've completed the information in step 4, you'll be able to tap the Next button.
6. Once you've tapped Next your iPhone or iPad will detect the settings automatically.
7. You'll then be shown a screen that will allow you to sync your Contacts, Calendars and Tasks. Select the items that you want to sync, select Save and then you're done!
Please note that if you've only got our Business Email Lite service which is powered by Office 365, you'll only be able to download your mail.